Why master iris defect suturing for cataract surgery? Why even try? I know at least some of my colleagues will ask themselves these questions when starting to read this article. By the time even the most dubious among us finish it, however, I hope more will give it at least some consideration.
Although not indicated for every iris defect, suturing significant defects has evolved into an increasingly viable way to spare patients debilitating visual disruptions—before or after cataract surgery—as well as troubling life-long cosmetic abnormalities.
|
|
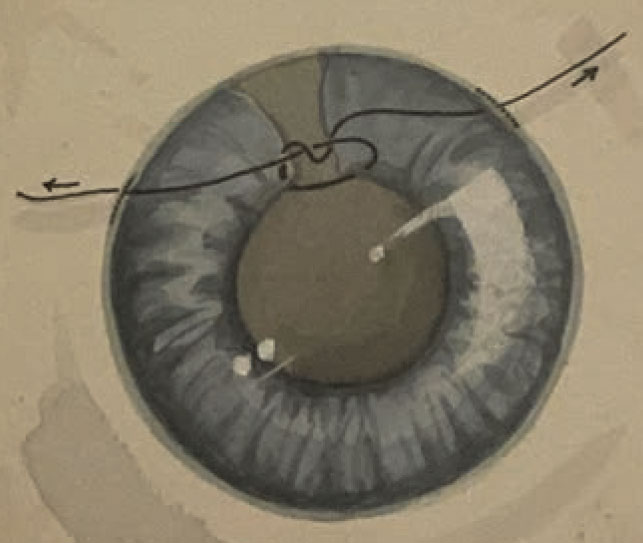
Figure 1. The sliding knot repair is created outside of eye during the Siepser slide-knot iris repair. (All photos: Steven B. Siepser, MD, FACS) |
Exactly what is a significant iris defect? This depends on what patients report to us. The Challenging and Complex Sub-Committee of the Cataract Committee of
ASCRS members now emphasizes that we shouldn’t dismiss any patient’s concerns solely based on the size of a defect.1 Remember that the potential effects of these defects on visual function are widespread and can include glare, light scatter, photophobia, monocular diplopia and reduced visual acuity and contrast sensitivity. Symptoms can range from evoked patient observations to life-altering distractions and disabilities.
These repairs are especially helpful in cataract surgery—most especially premium cataract surgery—to help us achieve the refractive outcomes that today’s patients expect. I’ve had the pleasure of introducing new suturing techniques and then seeing other surgeons refine these techniques through the years. (Imitation, I’ve learned, can be the highest form of flattery.)
Best of all, suturing an iris defect is often something you can do yourself. In this review, I’ll discuss congenital and traumatic iris defects, as well as iatrogenic defects caused by our surgical maneuvers. I’ll also go over indications for suturing, suggest suturing techniques and recommend when to rule out suturing. Risks and contraindications for intraoperative repair of iris defects and pupillary reconstruction will also be covered.
Good Reasons for Saying No?
Through the years, I’ve heard colleagues offer many reasons why iris defects are best left alone. Below are a few:
- Iris defects don’t significantly affect vision.
- Repairing an iris defect isn’t the number one priority during cataract surgery.
- Repairing or reconstructing an iris doesn’t make much of a difference to the patient.
- Going to this trouble doesn’t really work or help—so why do it?
- We’ve always done surgery without fixing iris defects. Why change now?
- The iris tears like wet tissue paper.
The reality is that iris defects can cause a broad spectrum of problems for our patients. The defects may be congenital, traumatic, intraoperative or idiopathic. (See Risks to the Iris During Cataract Surgery below.) Acquired conditions, such as traumatic mydriasis and iridodialysis, may also play a role.
Suturing to Reconstruct an Iris
When reconstructing an iris, we typically seek to achieve one of three objectives:
- correcting functional impairment;
- securing the integrity of the anterior segment; or
- addressing patients’ cosmetic concerns.
We need to customize treatment to address the problems at hand. Although I’ll focus primarily on suturing repairs, other needed interventions may be necessary to respond to large iris defects in cataract surgery patients, such as corneal tattooing and placement of an artificial iris.
In small-pupil cases, it may be helpful for you to counsel patients and their families regarding the possibility of prolonged surgical time. If the reconstruction involves the potential use of a pupil expansion device, for example, it will pose a greater risk of iris damage, possibly giving rise to functional or cosmetic problems after surgery. If you’ve prepared the family and your OR staff for a potentially complicated procedure, you won’t have to contend with arbitrary time pressures challenging your desire to do what’s best. Avoid being led down an unproductive primrose path. It’s far easier to tell a family that you spent some extra time getting things just perfect than to explain why another intervention is needed.
Each of us is at risk for panicking when things go south. At such a moment, take several deep breaths and count to 10. A case may seem to spiral into an emergency, putting you at risk for a phenomenon called time compression, which will interfere with your judgment. A short moment of meditation will give you the time to come up with an alternative plan.
Like many of us, I often struggle to complete my share of challenging iris repairs without losing concentration and focus. Earlier in my career, when operating on aphakic patients who required thick, high-plus glasses or contact lenses, I was always able to improve their vision, but unable to fix terrible sector iridectomies. I often found no safe and effective way to repair these defects.
The McCannel technique, introduced in 1976, provided us with an open-chamber direct method of iris suturing. To perform the technique, we needed to bring the defect to the corneal opening to pass a 10-0 nylon suture into the edge of the defect. In 1994, I was able to advance this technique by using a closed chamber “sliding knot” approach I had borrowed from a fly-tying technique used in fly fishing.
How to Use the Sliding Knot
My approach relies on the use of the two paracenteses, which keep the anterior chamber formed with the aid of viscoelastic. Here’s how it works: Initiate your proximal paracentesis with a 15-degree blade, creating a 1.2-mm incision that’s 0.5 mm anterior to the limbus. Make a 6 o’clock incision and lubricate the cornea. You can line up your approach to the incisions by positioning a Sinskey hook over the defect.
|
|
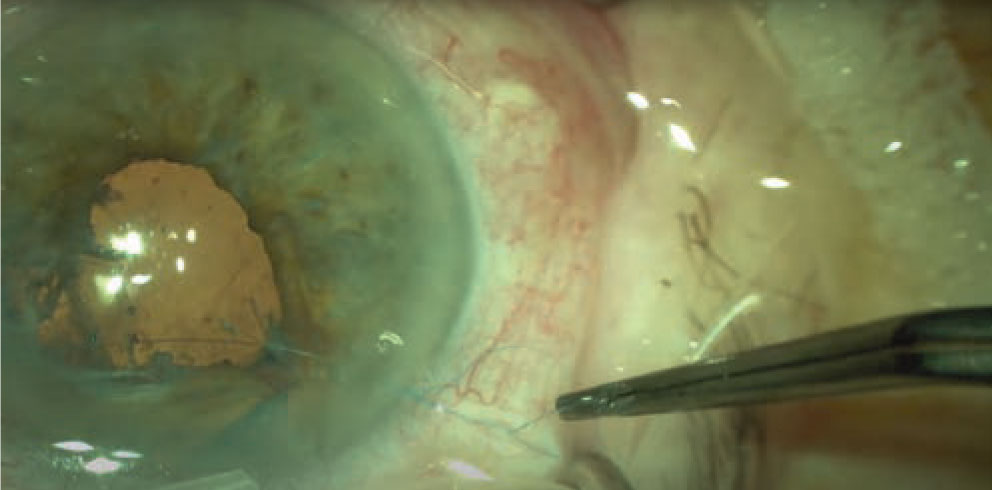
Figure 2. The sliding knot is internalized to close a portion of the iris defect. |
 |
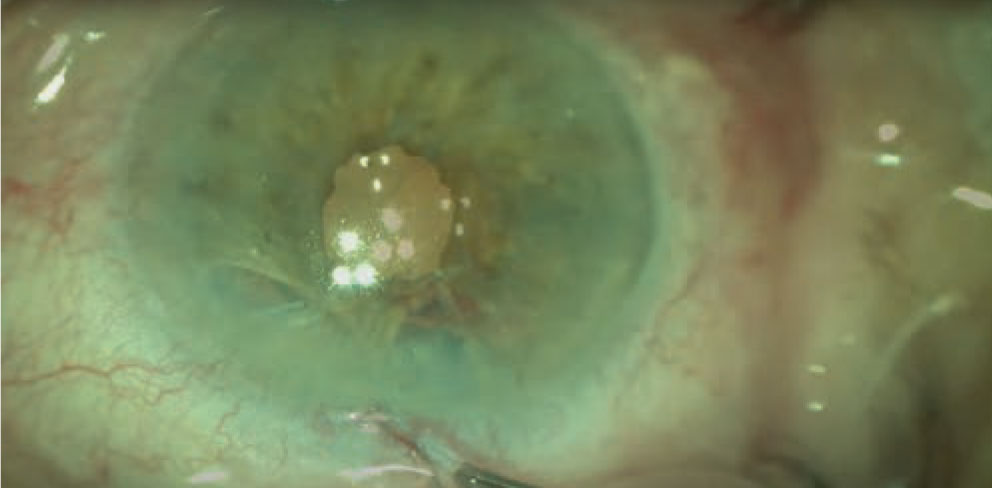
| Figure 3. By continuing to create sliding knots and internalizing them, the surgeon is progressively able to completely close a significant iris defect. |
As you know, when an iris is damaged or sections of the iris are cut, it retracts, much like a long garden worm that shrinks down to almost nothing when cut. Polypropylene suture with a CIF-4 needle, often present in the OR, can be used for these situations. Once the paracenteses are in place, with an additional incision 90 degrees away, you can begin the procedure, usually using grasping, 25-gauge coaxial microforceps to tease and unfurl the retracted iris. (You’ll be impressed by the amount of iris that can be stretched to fill fairly large defects.)
Next, identify the end of the posterior pigment of the iris, locate the collarette for alignment, then pull and stretch the collarette to stabilize it. Once you’ve confirmed the location of the pigment margins, you can use a Luer-locked syringe and 27-gauge cannula to express viscoelastic and drive the needle point into the cannula. Pierce both sides of the iris with this technique. Next, dock the tip of the needle in the cannula and back it out of the distal paracentesis.
With the suture ends now externalized through each side of the paracentesis, insert a Bonn’s hook or Condon snare. After introducing the hook or snare, pass over the defect to grasp the suture that’s between the incision and the far side of the iris defect. Draw the grasped suture toward the proximal incision, thus making it into a loop, and then draw the loop out of the proximal incision. You can externalize this distal loop on the proximal side while the suture remains threaded through both sides of the iris defect. Then you can tie various sliding knots outside of the eye that can be slid into the eye and into position over the iris defect. Before I explain how this is done, consider what constitutes a sliding knot.
A sliding knot can be formed by using one, two, three or four throws, depending on the desired knot configuration. Keep in mind that it’s not the final configuration of the knot but the process of sliding it into position that makes this knot unique and effective. After making one of these sliding knots outside of the eye, grasp and pull on the suture end that’s extending from the knot through the eye and out the distal side of the eye, while maintaining your grasp on the suture end extending from the proximal side. By balancing these competing, pulling forces, you’ll be able to navigate the knot into the eye and park it atop the defect. Pulling on the suture ends from each side of the eye will enable you to tighten the knot, closing the defect while maintaining a closed chamber, without having to enter the eye. This doesn’t deform the iris, and it allows for a tight anatomic closure.
As you know, some irises have multiple defects. The process I’ve just described can be repeated as many times as needed to close every defect, making repairs possible in all medians during the same procedure.
Through the years, a number of modified suturing techniques have been introduced, many addressing the shortcomings of the original techniques, such as a steep learning curve or sutures protruding into the anterior chamber. Some modified suturing techniques have been used to respond to complex ocular pathology. Several of the innovations are described below. (The numbers associated with them represent the number of wraps used for each throw, meaning, for example, that a 2-1-1 square knot involves two wraps on the first throw and one wrap on the second and third throws.)
• Osher, Cionni, Snyder Siepser variant. Throws are created by threading a suture end through the loop. The 2-1-1 square-knot configuration distinguishes this technique from the 2-1 throws of my original technique.
• Condon Siepser variant. Throws are created by wrapping the side of the suture loop attached to the iris around forceps before grasping the other suture end. This also features 2-1-1 square-knot-configured throws.
• Ahmed Siepser variant. Throws are created by wrapping the side of a suture loop that’s not attached to the iris around the forceps before grasping the other suture end. This variant features 3-1-1 square-knot-configured throws.
• Narang, Argarwal Siepser variant. A single throw of four wraps is completed as part of my original maneuver.
• Ogawa Ahmed variant. This technique relies on an instrument inside the eye to act as a pulley to hold the knot in place until it’s taut. The Ahmed component relies on coaxial forceps inside the eye to stabilize and tighten the knot.
Additional Suturing Techniques
|
|
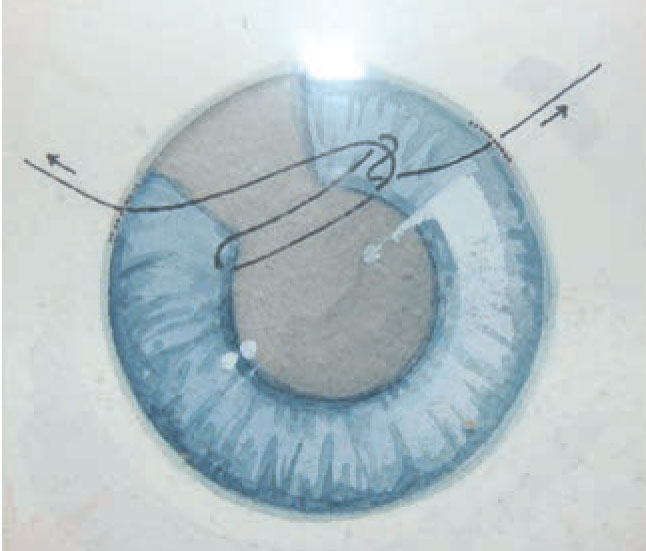
Figure 4. In this illustration, the sliding knot is created outside the eye and then drawn over the defect. |
Iris cerclage is another proven suturing technique, best used to help us control persistent mydriasis caused by diffuse iris sphincter dysfunction.2,3 We can use this approach to rescue a pupil from permanent disfigurement, achieving excellent control of the patient’s final pupil size. The technique is an ideal way to treat mydriasis following trauma, providing the patient with good functional and cosmetic results.
You begin performing iris cerclage by making 1-mm stab incisions at 9, 5, and 1 o’clock over the limbus or the clear cornea. Next, fill the anterior chamber with viscoelastic and insert forceps through the 1 o’clock port while you’re inserting a needle that conveys a 10-0 polypropylene suture through the 9 o’clock incision. Use your forceps to grasp and stabilize the iris. Make three to four bites peripheral to the pupillary edge before removing the forceps from the anterior chamber.
You’ll then need to use a blunt instrument to guide the needle out of the incisions or to dock the needle in a cannula to back it out. This cycle should be repeated three or more times. The result of the repeated efforts will be continuous bites encircling the pupillary margin, with both suture ends exiting the 9 o’clock port. The suture ends can then be pulled to create the appropriate pupil size and tied externally or by using a slipknot approach.
The cerclage—or purse string technique, as it’s also known—provides your patient with a substantial aesthetic advantage when you’ve repaired a mydriatic pupil. The bottom line: Unlike the other methods I’ve discussed, this suture technique lets you create a round pupillary aperture.
Risks to the Iris During Cataract Surgery Think of the risks to the iris that can arise during cataract surgery. Small pupils, for example, predispose patients to iatrogenic damage because the pupils can be easily damaged by phaco, aspiration ports and surgical instruments. Meanwhile, the iris of a pupil of any size can be inadvertently aspirated by the phaco or irrigation/aspiration tip. Repeated mechanical contact with the iris by a chopper or even large, dense nuclear fragments can lead to pigment loss, chaffing of the iris constriction and pupillary distortion, a situation found more often in patients with uveitis and glaucoma. Other risks include inadequate pupillary dilation, associated with insufficient response to mydriatics, senile miosis and surgeons hurrying to do surgery before full dilation takes hold. Fibrosed pupillary margins, pseudoexfoliation, iris synechiae and medication-related floppy iris syndrome may also be implicated during surgery. In addition, of course, we know that we should always guard against thermal damage, excessive tissue manipulation and prolapse. Stretching or distorting pupillary sphincter muscles can injure the midperipheral sphincter or iris root and can be associated with iridodialysis. Preventive measures include administration of non-steroidal anti-inflammatory drugs and mannitol to lower pressure in the eye. Of course, a careful history is always important to assess patients for past usage of systemic alpha-adrenergic receptor antagonists and other miosis-causing medications. Iris rings and pupil expanders should be used judiciously; try to rely more on OVDs to achieve viscomydriasis. Concentrations of eyedrops, such as those containing 10% phenylephrine, may be indicated, if safe for the patient. Some surgeons recommend using atropine preoperatively in patients with IFIS.8 |
Over time, surgeons have innovated with other novel approaches to surgically manage the effects that complex ocular pathologies have on the iris. One is the use of the modified sewing machine technique for iridodialysis repair—so named because it replicates the action of a sewing machine by using a pre-threaded 26G/30G needle with a prolene suture to achieve a minimally invasive repair.
Another suturing technique for iris repair is done with the mattress suture.5 The mattress suture—which is also included in the technique used to improve cosmetic outcomes in the repair of sectoral iris defects—has been used to help surgeons succeed with iridodialysis repair. Additionally, this bowstring suturing technique has been employed to treat traumatic aphakia that involves a large iris defect. The technique combines tangential and radial suturing loops that are used to center and reconstruct much of the pupil. The remainder of the procedure involves an iris-claw implant and the implantation of custom-made sectoral iris prostheses.
For Large Defects
|
|
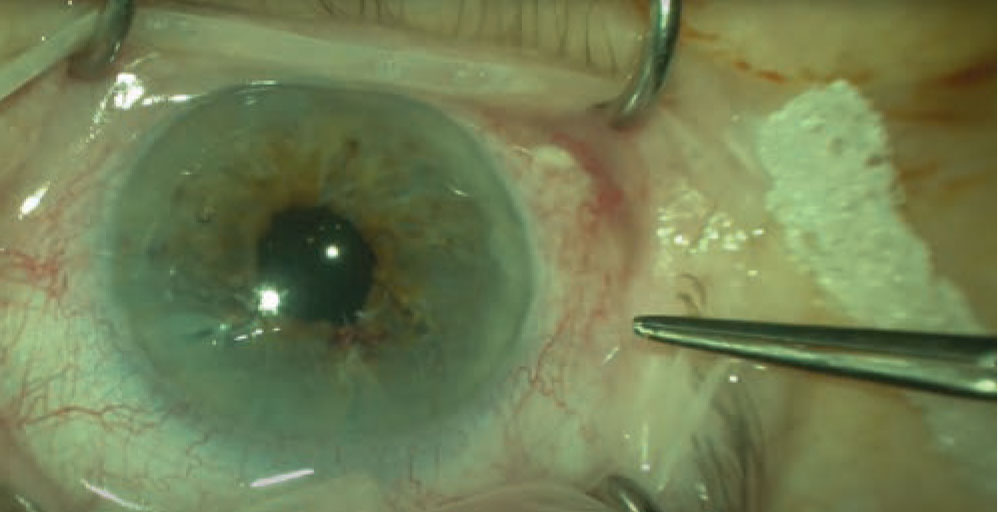
Figure 5. The sliding knot has been internalized, placed over the iris defect and tightened by adjusting the tension from outside each paracentesis. |
In some patients, such as those with aniridia or large sectoral defects, iris suturing isn’t feasible. Surgical alternatives to suturing in iris reconstruction in these cases include the implantation of iris prosthetic devices and corneal tattooing. Each of these alternatives has benefits and drawbacks. (I’m leaving out cautery, used by some surgeons, because more study of cautery is needed.)
Let’s first review the use of prosthetics. Some prosthetic devices are designed for capsular bag placement. Others are intended for scleral fixation or passive sulcus fixation. These devices can be essential in the treatment of aniridia and can also be used for albinism and large pupillary defects. Currently, three general types of prosthetic irises are available:
- an iris-lens diaphragm;
- a device that’s based on an endocapsular capsular tension ring; and
- a customized artificial iris.6
An iris-lens diaphragm can correct both aniridia and aphakia. However, it requires large incisions for implantation and can be difficult to position. You can insert an endocapsular CTR-based device through much smaller incisions. However, some models are brittle and prone to fracture, requiring an intact capsular bag.
A customized artificial iris is a personalized silicone implant that resembles the fellow eye.7 The implant is foldable, allowing insertion through a small incision, but it has no central optic, requiring an accompanying IOL implant, if one is indicated. Insertion options for the artificial iris include implantation in the sulcus with transscleral suture fixation or with capsular support and with endocapsular implantation. Only one prosthetic iris, CustomFlex Artificial Iris (HumanOptics), has been approved by the U.S. FDA.
Why Do Nothing?
As you can see, iris suturing and alternative approaches have greatly expanded our repertoire of interventions that we can use to help patients with a variety of iris defects and related issues. The time to leave well enough alone has passed. I hope more of us explore these options to optimize patients’ experiences and improve their vision in the years ahead.
Dr. Siepser, an anterior segment surgeon and the medical director of Siepser Eye Care in Wayne, Pennsylvania, is the inventor of the sliding knot approach to iris defect repair and has been involved in the development of other surgical techniques through the years. He is the owner of Siepser Technologies, LLC, focused on development of ophthalmic-related products, and SightAssure, offering patients insurance against inadequate surgical outcomes. He is also a consultant for instrument-maker Gulden Ophthalmics (Elkins Park, Pennsylvania) and IOL-maker Rayner Surgical (New York, New York).
1. Foster, GJL, Ayres B, Fram N, et al. Management of common iatrogenic iris defects induced by cataract surgery. J Cataract Refract Surg 2021;47:4:522-532.
2. Behndig A., Small incision single-suture-loop pupilloplasty for postoperative atonic pupil. J Cataract Refract Surg 1998: 24:11: 1429-1431.
3. Ogawa GS. The iris cerclage suture for permanent mydriasis: A running suture technique. Ophthalmic Surgery, Lasers and Imaging Retina 1998;29:12:1001-1009.
4. Venkata K, Kumar R. Modified sewing machine technique for iridodialysis repair, intraocular lens relocation, iris coloboma repair, Cionni ring fixation, and scleral-fixated intraocular lens. Indian J Ophthalmol 2018;66:88:1169-1176.
5. Tsao SW, Holz HA. Iris mattress suture: A technique for sectoral iris defect repair. British Journal of Ophthalmology 2015;99:3:305-307.
6. Srinivasan S, Ting DS, Snyder ME, et al. Prosthetic iris devices. Canadian Journal of Ophthalmology/Journal Canadien d’Ophtalmologie 2014;49:1:6-17.
7. Voelker R. First Artificial Iris Ok’d. JAMA 2018;320:1:23.
8. Bendel RE, Phillips MB. Preoperative use of atropine to prevent intraoperative floppy-iris syndrome in patients taking tamsulosin. J Cataract Refract Surg 2006;32:10:1603-5.