Most doctors think of gonioscopy as simply a means to find out whether a patient has open- or closed-angle glaucoma. Actually, there are many reasons to perform gonioscopy on all of your glaucoma patients; doing so can provide you with a tremendous amount of information. After all, most of the aqueous humor leaves the eye through the trabecular meshwork, and when patients have elevated pressure there's usually something wrong with their outflow. It makes sense to look at the structure responsible for much of that outflow.
Gonioscopy is especially valuable in cases of pseudoexfoliation, pigmentary glaucoma, tumors or previous trauma. Nevertheless, it's important to do it on all of your glaucoma patients because you need to know what a healthy angle looks like in order to diagnose a diseased angle. Furthermore, you don't want to be rusty when gonioscopy suddenly becomes an essential part of a case.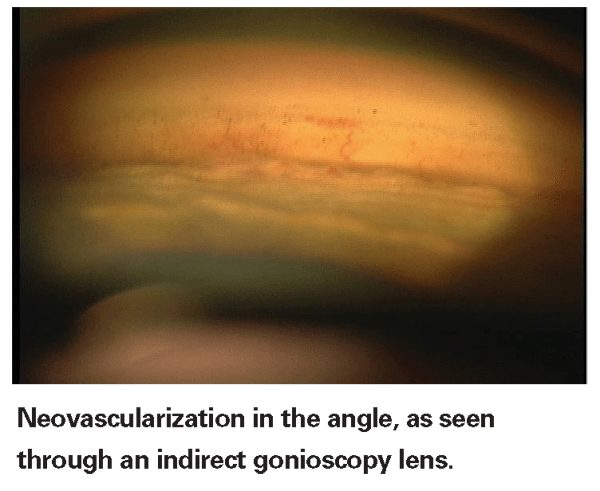
Unfortunately, it appears that many doctors seldom perform gonioscopy. A 1996 study found that in a community-based sample, only 51 percent of patients with open-angle glaucoma had gonioscopy performed at initial presentation.1 That's a pretty poor track record.
Why is this the case? In many instances, I suspect doctors haven't learned to do it well. Some gonioscopy techniques can be a little cumbersome and slow down patient throughput in the clinic. But if you become facile at gonioscopy—especially using a four-mirror lens—it won't take much more time than checking intraocular pressure. The bottom line is that if you commit to learning to do it, it's not especially challenging. (However, it does require practice.)
Which Lens to Use?
If you seldom perform gonioscopy, or are just starting out in practice, you may wonder which of the two main lens styles (three-mirror and four-mirror) makes the most sense to use. The answer is that it depends on the situation.
The best view of the angle is obtained through a Goldmann-style three-mirror lens. (We recently created a website dedicated to instructional gonioscopy videos—for more about that, see "Gonioscopy.org: A Video Atlas" below—and the majority of the videos at Gonioscopy.org were filmed with a three-mirror lens.) The three-mirror lens is also easier to use and master than the four-mirror lens. However, using the three-mirror lens requires a thick methylcellulose coupling solution to help eliminate air bubbles between the lens and the eye. That creates a beautiful view, but the methylcellulose solution makes it impossible to do perimetry or fundus photography afterwards, as the material takes time to disappear from the eye. It's a great lens for surgical procedures in the angle such as trabeculoplasty, but it's much less convenient for daily use.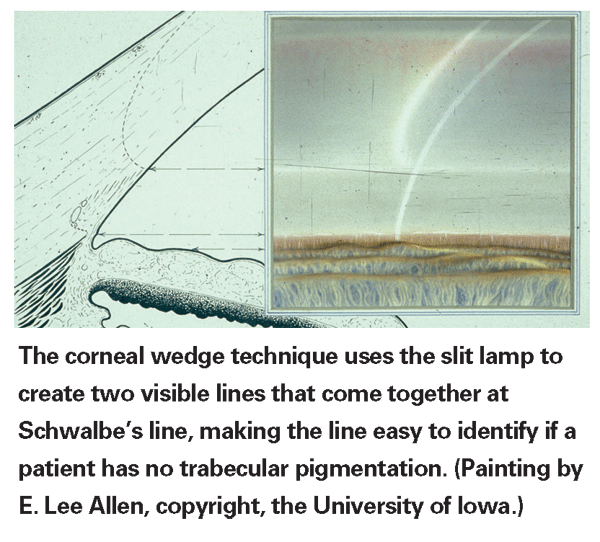
In contrast, the four-mirror lens is a little harder to master and use, but once you're good at it, it's very fast. (That's significant if you perform gonioscopy on all of your glaucoma patients.) It can be applied with the patient's own tears coupling the lens to the ocular surface—it doesn't require methylcellulose-based solutions. It also has another significant advantage over the three-mirror lens: In a three-mirror lens, only one mirror points at the angle; the other two are used for looking at the peripheral retina. As a result, you have to rotate the lens 360 degrees to see the entire angle. But with a four-mirror lens, all four mirrors show the angle, so you only have to rotate it a few degrees. That's a key reason that it's a little faster to use.
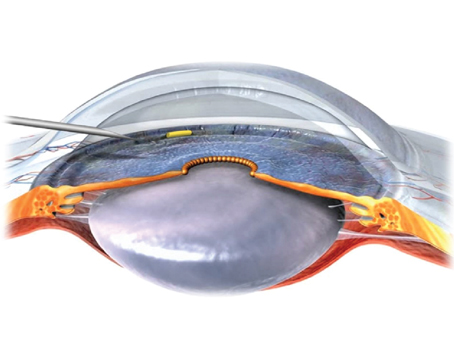
It is possible to perform direct gonioscopy (as opposed to indirect gonioscopy using a mirrored lens). However, this technique is seldom used today outside of the operating room because it's cumbersome and time-consuming; the patient has to lie in a special room with special equipment. (Even with direct gonioscopy a special lens is required to work around the visibility problems caused by the iridocorneal angle reflecting light back into the eye.) In contrast, indirect gonioscopy can be performed at a slit lamp.
Two Techniques Worth Learning
A couple of special gonioscopy techniques are particularly useful:
• Indentation gonioscopy is a strategy that helps determine whether angle closure is the result of the iris being in apposition (i.e., just touching the angle) or the result of the iris actually being stuck on the angle, via synechiae. Indentation gonioscopy is also a great tool for diagnosing plateau iris. It involves using the lens to apply pressure to the central cornea, driving the iris posteriorly—sort of a dynamic version of the gonioscopy exam.
This technique is easy to perform with a four-mirror lens, but isn't feasible with a three-mirror lens, for two reasons: First, the area of the four-mirror lens that contacts the cornea is smaller than the total surface of the cornea, while the three-mirror lens's area of contact is larger than the cornea. Second, the four-mirror lens's area of contact is relatively flat, so when you push against the cornea, the cornea indents easily and moves the iris very readily. In contrast, the three-mirror lens vaults over the cornea and touches the eye on the sclera.
• The corneal wedge, or parallelopiped, is a technique that helps the examiner identify the anterior border of the trabecular meshwork in patients where the border is difficult to see, either because of a lack of pigment or because of excessive pigment. (When that border is difficult to identify, it can be nearly impossible to tell whether you're looking at an open or closed angle.)
Over the course of a person's life the trabecular meshwork gradually accumulates pigment; it's constantly draining fluid from the eye, and that fluid has some debris in it, such as pigment from the iris. By the time we're in our 60s or 70s the meshwork is nicely highlighted by this pigment, and the structures are pretty easy to identify. But a very young patient may have no pigment in the meshwork, which can make it difficult to tell whether you're looking at the corneal endothelium or a non-pigmented meshwork.
The corneal wedge technique uses the slit-lamp beam to reveal the anterior edge of the trabecular meshwork. The practitioner makes the slit beam very thin and bright and offset from the oculars. Through the gonioscopy lens the thin slit of light appears as two lines; one line strikes the surfaces from the inside of the eye, crossing the iris and the angle. The other line, which looks broader and fuzzier, is created by the slit of light striking the external cornea. That second line curves in along the interface between the cornea and sclera at the limbus to meet the first line at the anterior edge at Schwalbe's line, thus making it clear where the cornea ends and the meshwork begins.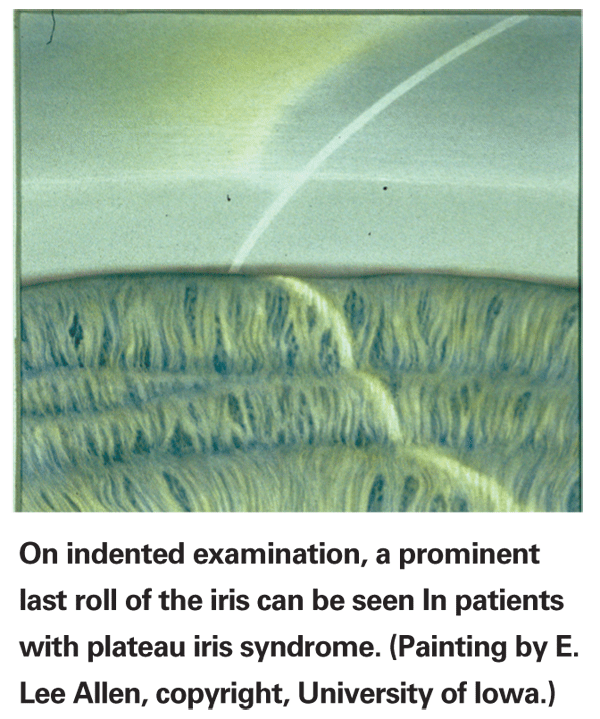
It's important to note that the corneal wedge technique works best in a darkened room. It also helps if the patient looks slightly away from the examining mirror; this makes the wedge easier to find.
As noted earlier, these techniques, and others like them, need to be learned by practicing them on normal patients, rather than waiting until you need them in a difficult case.
Pearls for Gonioscopic Success
Here are a few strategies to help you make the most of gonioscopy. Many of these are illustrated "in action" on the Web at Gonioscopy.org.
• Gonioscope all of your glaucoma patients. This will ensure that you're in practice and well aware of how different conditions appear through the lens.
• If your skills are rusty, practice on friends or relatives who wear contact lenses. I often give this advice to residents. These individuals can be good subjects to learn on because they're used to people fussing with their eyes and something being close to the eye.
• Make sure you're positioned comfortably for the exam. I recommend bracing your elbow so it's fixed against the slit lamp table.
• Prepare the patient to minimize surprise and fear. Tell the patient that the lens will come close to the eye but will not hurt it. This way, the patient won't be surprised to feel the lens against the eyelashes.
• Position the patient to allow the slit lamp the maximum amount of excursion. Lining the patient's eye up with the canthal mark on the slit lamp is even more important when performing gonioscopy than when conducting a quick slit lamp exam.
• If you're tall or have long arms, try a Sussman lens or other lens without a handle. Since you hold it between your fingers, the spacing often works better for longer arms. However, the long barrel can make it difficult to offset the light source from your oculars.
• Hold the four-mirror lens against the eye lightly. One disadvantage of this lens is that novices may work so hard to hold the lens in place that they unintentionally indent the cornea. (In contrast, the methylcellulose coupling solution used with a three-mirror lens creates suction that keeps the lens on the eye without much effort from the doctor.) If the cornea is indented, the angle may appear open solely for this reason.
A good way to confirm that you're not unintentionally indenting the cornea with a four-mirror lens is to let air flash in and out between the lens and cornea. (A video of how this looks through the lens can be seen at Gonioscopy.org.) Another way to avoid this problem is to note if folds or striae appear on the cornea—a clear sign that you're pressing too hard.
Note that the air bubble technique would not work with a three-mirror lens. If air gets into the methylcellulose solution between the three-mirror lens and cornea it will degrade the view, requiring removal and repositioning.
A few tips for using a three-mirror lens:
• Keep bubbles out of the methylcellulose. Bubbles will obscure your view. So, when filling the concavity of this lens, you can start by pouring the methylcellulose onto a tissue and then transferring the stream to the lens concavity. Or, you can remove the dropper cap and deliver a glob of methylcellulose directly into the lens concavity.
• Forewarn the patient that some of the fluid will run down her cheek, and that the material is not harmful. This will help to prevent surprise and unwanted patient movement.
• Hold the lens with three fingers and brace the other two fingers against the patient's face. This will allow you to rotate the lens continuously without using the second hand and letting go of the slit lamp controls. (This maneuver does take a little practice.)
• If the lens sticks to the eye, push on the eye with your index finger. This will break the seal caused by the methylcellulose solution without hurting the patient.
Dr. Alward is Frederick C. Blodi Chair in Ophthalmology and director of the Glaucoma Service in the Department of Ophthalmology at the University of Iowa Carver College of Medicine.
1. Hertzog LH, Albrecht KG, LaBree L, Lee PP. Glaucoma care and conformance with preferred practice patterns. Examination of the private, community-based ophthalmologist. Ophthalmology 1996;103:1009-13.