Although it’s relatively rare, IOLs can sometimes become dislocated, usually because of the absence of zonular support. Sometimes remedying (or preventing) that requires fixating the current or replacement lens in position. The lens may be sutured to the iris, or even replaced with an anterior chamber lens, but often the lens is fixated to the sclera using one of a number of popular techniques.
Is one fixation technique better than another? Even retrospective studies have rarely compared techniques directly, but a 2020 assessment made by the American Academy of Ophthalmology reviewed 45 relevant studies and found that no technique has proven itself superior to the alternatives.1
Here, eight surgeons discuss the pros and cons of the most popular IOL fixation techniques, and offer pearls for making the procedures go smoothly and produce the best outcomes.
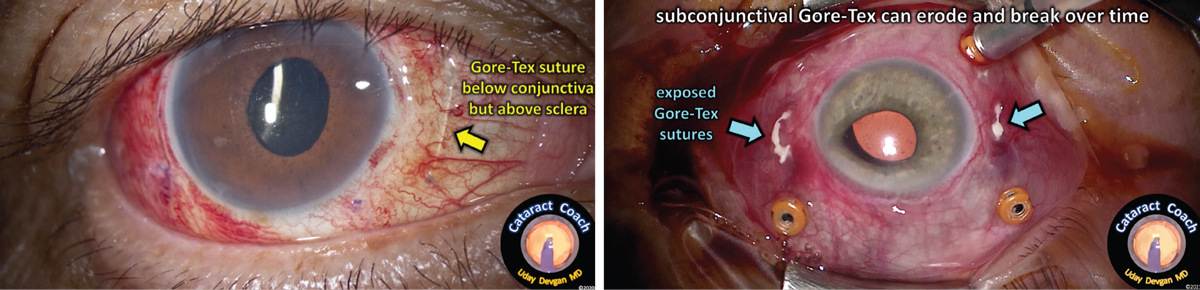 |
| When suturing a lens in place, it’s important to make sure that the suture material (most commonly Gore-Tex) is buried within the sclera. If it’s just sitting under the conjunctiva (above, left), the result can be exposure and breakage of the sutures and a dislocated IOL (right). Photo: Uday Devgan MD. |
Planning Your Fixation Surgery
Surgeons suggest considering a number of factors when faced with a lens that needs fixation:
• In terms of timing, factor in whether the patient has had a previous vitrectomy. “Most of the time, you have several weeks or even months to repair a case of pseudophakodonesis with an IOL/capsular bag complex,” says Richard S. Hoffman, MD, a clinical associate professor of ophthalmology at the Casey Eye Institute, Oregon Health and Science University, and a partner at Drs. Fine, Hoffman, & Sims in Eugene, Oregon. “However, if the patient has had a previous vitrectomy, the lens can drop very quickly. You should treat this as an urgent case, and make the repair within one to two days, if possible.”
• Base your choice of approach on how much capsular support the lens has. Uday Devgan, MD, FACS, FRCS, in private practice at Devgan Eye Surgery in Los Angeles, points out that if the lens still has some capsular support, a relatively easy option is suturing the IOL to the back of the iris. “Those sutures are protected because they’re inside the eye,” he says. “They can last a long time. And because there’s at least some capsular support, the lens isn’t going to move around too much.”
Eric D. Donnenfeld, MD, clinical professor of ophthalmology at New York University Medical Center and a partner at Ophthalmic Consultants of Long Island, agrees that if some support still exists, iris fixation is worth considering. “Suturing to the iris is very reasonable when, for example, the lens has dislocated horizontally rather than into the vitreous,” he explains. “In this situation I just put a simple Siepser suture through the iris and through the IOL. That holds the lens in place very effectively.”
On the other hand, Dr. Devgan notes, if there’s zero or minimal capsular support, you’re better off fixating the lens to the sclera. “If you’re willing to use sutures in this situation,” he says, “you can suture the lens to the sclera with 8-0 Gore-Tex or 6-0 prolene using what’s called a belt-loop technique. If you don’t want to use any sutures, you can use the Yamane technique, in which you bring the haptics of a three-piece lens outside through scleral openings, cauterize them to create a flange, and then lock the flanges in place within the sclera.”
• Don’t attempt IOL fixation without the right tools. “If you’re going to do IOL fixation, you need to be comfortable doing pars plana vitrectomy and bimanual surgery, and you need to have the right lenses available to perform the surgery,” says Dr. Donnenfeld. “If you have these skills and the right lenses, you can become pretty adept at these techniques fairly quickly.”
• Don’t expect any IOL-fixation procedure to be “one-size-fits-all.” “The fact that there are so many options for fixating a lens tells you that there’s no one ideal approach,” says Kevin Rosenberg, MD, who practices at Retina Vitreous Surgeons of Central New York and is a clinical assistant professor of ophthalmology and visual sciences at SUNY Upstate Medical University, in Syracuse, New York. Dr. Rosenberg says that today he’s largely transitioned to performing a modified Yamane technique using 27-ga. trocars. “I think that the Yamane technique is a really good procedure, but I’m constantly fine-tuning it. There are many ways in which it can be a little off. So the ‘perfect’ IOL-fixation procedure is still a work in progress.”
 |
| An example of intrascleral placement of the sutures for IOL fixation. (A video of the technique shown above can be viewed at: https://cataractcoach.com/2022/10/17/1624-gore-tex-intra-scleral-iol-fixation.) Photo: Uday Devgan MD. |
Choosing the Right Implant
It’s important to be cognizant of the limitations and advantages associated with the different lens options when the lens needs to be fixated.
Efrem Mandelcorn, BSc, MD, FRCSC, a researcher at the Krembil Research Institute, University Health Network, in Toronto, an attending surgeon at the Toronto Western Hospital and an associate professor at the University of Toronto, points out that not all lenses work equally well if you need to fixate them. “You don’t want to pick a lens with flimsy haptics,” he notes. “If the haptics are flimsy, there’s a much greater chance that they’ll bend or kink. I tend to favor Johnson & Johnson’s AR40 Sensar lens; its haptics don’t usually deform, helping to ensure a better outcome.”
“Suture fixation comes with a number of limitations,” notes Brandon D. Ayres, MD, a cornea specialist at Wills Eye Hospital and an instructor at Jefferson Medical College, Thomas Jefferson University in Philadelphia. “For one thing, you have to manage the sclerotomies and not get the sutures tangled. In addition, there are a limited number of implants that we can fixate, and those have limitations as well.
“For example, one of our favorite lenses to suture-fixate has been the Akreos AO60,” he says. “This was a fairly easy technique to learn, very repeatable, and we saw very little inflammation in the eye. However, an eye that needs lens fixation tends to have more problems than an average eye, and if the patient ends up with a retinal detachment or needing a transplant, then we might have to use air or gas inside the eye. That turned out to be a problem, because we found that when we exposed that implant to air or gas, it could calcify. So we’d fix a dislocated lens; then three years later the cornea would decompensate and the patient would get an endothelial graft. Four months after that, the lens had calcium deposits that you couldn’t dissolve or laser away. You had to remove the lens. So even though we had a great technique that seemed to be safe and repeatable, it came back to bite us.
“The second lens we tried was the Bausch + Lomb MX60 implant,” Dr. Ayres recalls. “The MX60 is a different shape, but we could lace a suture through what we call the haptic bridge, a little eyelet, if you will, right where the haptic inserts into the optic. Things looked pretty good and our results were nice, but we found that the haptic bridge would sometimes break, releasing the suture. So this lens didn’t calcify, but if we tied the sutures too tight, the implant might dislocate again down the road.
“The third commonly sutured implant is Alcon’s CZ70BD,” he notes. “The CZ70 lens is a large, single-piece PMMA lens. Like the other options, it has advantages and disadvantages. It’s very durable, and the haptics have little eyelets meant to help with lens positioning. We can lace a Gore-Tex suture through those eyelets, allowing the lens to be held very securely. And because the lens is large, we don’t have to worry about centration nearly as much. “The downside is that it’s a 7-mm lens. That means you have to make at least a 7-mm wound, losing the advantages that come with making a small incision.
“However, if the patient has an anterior chamber lens that needs to be removed due to chronic inflammation or corneal edema, I tend to implant the CZ70,” he says. “It takes a large incision to remove an AC-IOL. Since I already have to make a big wound, I might as well put a big implant back in.”
Dr. Devgan adds that a lens with four haptics may achieve better fixation if fixated with sutures as opposed to the Yamane technique. “If you only have two points of fixation, one on each side, it’s possible for the lens to tilt, like a hammock,” he notes. “If I’m concerned about that, I’ll use sutures and create four-point fixation. That will secure the lens in place, and there’ll be no tilting or malpositioning of the lens. Bausch + Lomb’s Akreos lens has four eyelets, making it especially good for securing in place.”
Before Starting the Surgery
To avoid postop surprises:
• Warn the patient that their glasses prescription will most likely change after the surgery. “That’s a side effect of the anterior or posterior displacement of the IOL from its original plane,” Dr. Hoffman explains.
• Examine the patient at the slit lamp the day before surgery, or immediately before surgery. “I’ve had two patients who, for some reason, didn’t appreciate that their vision had dropped to finger-counting because the lens had dropped onto the retina,” Dr. Hoffman recalls. “Nothing is more frustrating than blocking a patient and then discovering in the OR that the case isn’t operable from an anterior approach.”
• Check the lens position with the patient reclining. “Have the patient lie back in the exam chair and look at the lens position with an indirect ophthalmoscope for illumination,” advises Dr. Hoffman. “Sometimes the lens is in the proper plane when the patient is upright, but hanging by a few zonules when supine. If the lens is hanging or significantly displaced posteriorly in the supine position, you may need to coordinate the case with a retina specialist.”
• Check the endothelial cell count. “The results are usually good no matter what lens you use,” notes Dr. Ayres. “However, you have to watch your patient closely, and try to predict the future. Will this patient need additional retinal or corneal surgery later on? For that reason, I check the endothelial cell counts in all of these patients. You have to use that information to help you pick the implant that’s going to be the best for that patient.”
• Don’t be afraid to refer these cases out. “These are complicated surgeries,” notes Dr. Devgan. “If you know another surgeon can get a better result than you, there’s no shame in referring the patient to that surgeon.”
Dr. Ayres agrees. “If you don’t do this procedure on a regular basis, you can quickly find yourself out of your comfort zone,” he says.
• If you do refer out a patient, explain that you’ll correct any remaining refractive error later. “I tell my retina colleagues which lens to implant in such a patient,” notes Dr. Devgan. “I advise them to err on the side of leaving the patient a little myopic. Then, three months after the surgery, I’ll do LASIK for these patients and make them ‘20-happy.’ I tell the patient that it’s like hitting the golf ball from the tee. The retina surgeon will get the ball onto the green. Once that heals in a few months, I’ll do LASIK and sink the putt, so we’ll get the patient to emmetropia.”
Traditional Suture-fixation
Surgeons offer these suggestions:
• Avoid using 10-0 Prolene in most patients. “We’ve found that 10-0 Prolene used for scleral fixation only lasts about 10 years,” explains Dr. Devgan. “I wouldn’t put that in a 40 or 50-year-old patient. It might be acceptable for a very elderly patient with a limited number of years left to live, but you want to make sure the sutures will last the patient’s lifetime.”
• Consider using a 27-ga. system for suturing. “This will have a lower risk of leakage from the sclerotomy sites,” says Jason Hsu, MD, co-director of retina research at Wills Eye Hospital and an associate professor of ophthalmology at Thomas Jefferson University in Philadelphia.
• Consider making your clear corneal incision temporal or superotemporal. “I pull my Gore-Tex sutures out nasally and temporally,” he explains. “If the incision is temporal or superotemporal, the IOL doesn’t have to rotate as much when it’s inserted. That makes it less likely to get twisted in the sutures.”
• Be careful when threading the suture through an eyelet. Omesh P. Gupta, MD, MBA, who practices at The Retina Service of Wills Eye Institute and is an assistant professor of ophthalmology at Thomas Jefferson University Hospital in Philadelphia, notes that IOL breakage is a common complication when fixating an IOL. “To avoid this, pay particular attention to handling the IOL when threading the suture,” he says. “Don’t place an instrument into the eyelet.”
• Make sure there’s no resistance when passing through the sclerotomies. “Any resistance could cause eyelet fracture,” Dr. Gupta points out.
• If you’re externalizing sutures, only externalize one before inserting the IOL. “I recommend only externalizing the leading nasal Gore-Tex suture before inserting the IOL,” says Dr. Hsu. “Externalizing all suture ends before inserting the IOL increases the risk of the IOL getting entangled in the sutures.”
• Once you’ve externalized the nasal suture, keep it taut as you insert the IOL. “Loose sutures at this stage can cause the suture to go under the haptic of the lens, causing the IOL to tilt,” Dr. Hsu explains. “You want both sutures above the plane of the haptics.”
• Consider using the “handshake” technique to reduce the chance of sutures becoming twisted or tangled—and pass the proximal suture first. “In the ‘handshake’ technique we put the suture into the eye using microforceps, and then use forceps held in the other hand inserted through a sclerotomy to grab the suture and externalize it,” explains Dr. Ayres. “When using this technique, we’ve found it’s much easier to prevent suture twists and confusion if we pass the suture that’s proximal to the surgeon first and the distal suture second.”
Not every surgeon agrees that this is an ideal approach, however. “Trying to hand yourself the suture in the anterior chamber using another forceps can increase the risk of suture entanglement,” says Dr. Hsu. “You may accidentally pull the suture out from under the plane of the IOL, causing it to tilt.”
• When externalizing the trailing temporal suture after the IOL has been inserted, try pushing the IOL posteriorly. “Doing this allows you to see the Gore-Tex strands coming out of the eyelets in the IOL,” explains Dr. Hsu. “At this point I insert my forceps through the corresponding temporal sclerotomy site and grab the suture as it emerges above the plane of the IOL.”
• If you’re using a 27-ga. system, take this into consideration when tying and burying the knot. “When beginning the procedure, mark the four sclerotomies well with an ink pen,” says Dr. Hsu. “This will facilitate visualization of the smaller 27-ga. sclerotomies.
“Later, when you’re ready to create your knots,” he continues, “I prefer the slip knot technique with an extra throw (1-1-1-1), as the knot will tend to be smaller and easier to bury. Grab the knot with the 27-ga. forceps—I use Alcon’s MaxGrip forceps—and directly dunk it into the sclerotomy that held the 27-ga. cannula, as this one will be more dilated.”
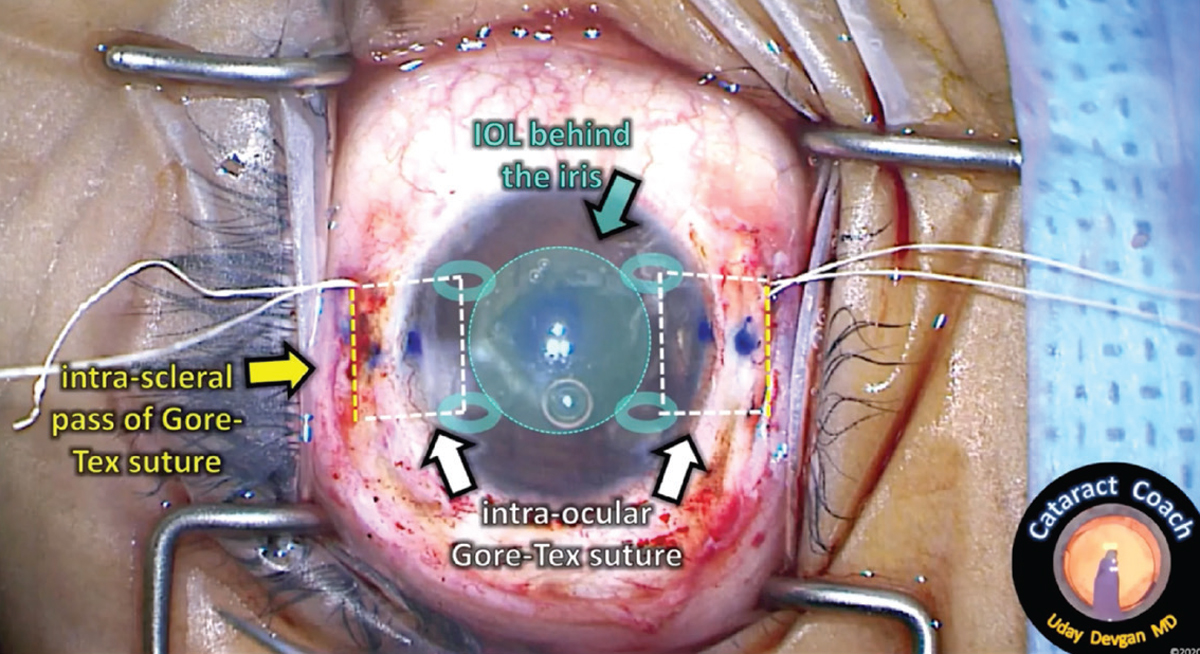
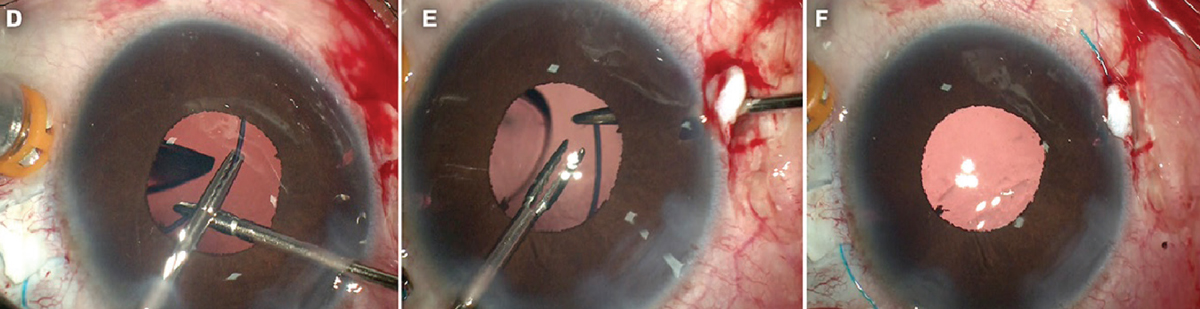
• Make sure the suture material (most often Gore-Tex) is buried within the sclera and not just sitting under the conjunctiva. Dr. Devgan notes that leaving the suture just sitting under the conjunctiva can lead to exposure and breakage of the suture and a dislocated IOL. (See Figure) “A better method is to have intra-scleral placement of the suture so that it’s secure for life,” he explains. (A video of this technique can be viewed at cataractcoach.com/2022/10/17/1624-gore-tex-intra-scleral-iol-fixation.)
• To avoid conjunctival erosion, reapproximate the conjunctiva away from the sutured IOL. “One of the most common complications when fixating an IOL is conjunctival erosion,” Dr. Gupta points out. “I usually drag the conjunctiva inferiorly and incorporate a scleral anchor.”
 |
| Above and below: The handshake technique being performed during the process of using glue to fixate an IOL. The handshake is being used to externalize the haptics for gluing. Surgeons note that the advantages of a glued IOL include stability; negligible tilt; there’s no pseudophakodonesis; and there’s no fear of suture erosion or irritation. Photos: Amar Agarwal, MD. |
 |
Gluing the IOL
Dr. Donnenfeld says he started out learning this technique and it’s still one of his favorites. “I think this technique offers the best centration and the least rotation of the IOL,” he says.
“To use this technique, you have to be comfortable creating a scleral pocket similar to what you’d create for a trabeculectomy,” he explains. “You use an MVR blade to perforate through the sclera, through the pars plana to the anterior chamber, 2.5 mm posterior to the limbus. Then you perform a pars plana vitrectomy to prevent vitreous from getting entangled with the IOL.
“Next, you reach in with a microforceps and use the ‘handshake technique,’ where you hold the haptic of the IOL with one hand while using a microforceps held in the other hand to pull the haptic through the pars plana,” he continues. “Then you perform an identical procedure on the opposite side, 180 degrees away. Finally you glue the flaps down with conjunctiva on the surface. This creates a nice planar IOL without rotation.
“There’s a little bit more work involved in this technique because you have to make the scleral flaps and move the conjunctiva down, but it’s a very good way to first learn to do IOL fixation,” he concludes. “I think it’s the least difficult technique to perform, and it’s still one I like very much.”
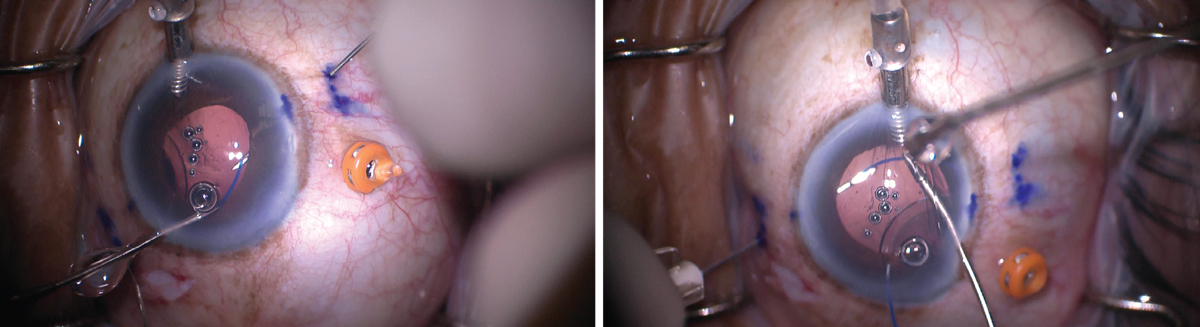 |
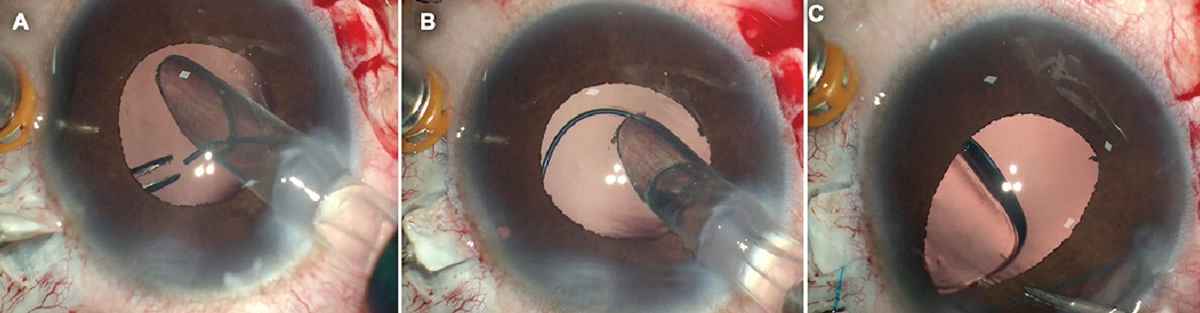
| When performing the Yamane fixation technique, the haptic is usually externalized by sliding it into the lumen of a needle, which is then used to pull it out. Surgeons note that because there’s very little “wiggle room” inside the lumen, it’s important to make sure that the haptic and needle are positioned so that they align properly (above, left); if not, the haptic won’t slide into the lumen (above, right). Photo: Brandon D. Ayres, MD. |
Using the Yamane Technique
The Yamane technique, in which the haptics are externalized and cautery is used to create a flange at the tip of each haptic, has become increasingly popular in the past few years. “The Yamane technique doesn’t require making a flap or gluing, although you still have to perform a thorough pars plana vitrectomy,” Dr. Donnenfeld explains. “You pass a thin-walled 30-ga. needle through the sclera, 2 mm posterior to the limbus; then you extend it 2 mm into the sclera and penetrate into the anterior chamber. Next, you grab the haptic of the IOL and insert it into the 30-ga. hollow-bore needle, allowing you to withdraw the haptic. Once the haptic has been externalized, you use low-temperature cautery to create a flange that holds the lens in place so it can’t fall back into the vitreous.”
One advantage of Yamane noted by surgeons is the absence of suturing. “Suturing is more cumbersome for the surgeon,” Dr. Mandelcorn points out. “Also, sutures can break early or late, and sometimes, suturing an in-the-bag IOL doesn’t end up perfectly centered when you tighten each end. This forces you to add another suture in a third location, adding more time and uncertainty to the centration of the implant.
“It’s true that all of this is less of an issue if you’re using a CZ70 PMMA lens, which has eyelets in the haptics,” he notes. “However, the CZ70 is a 7-mm IOL, so you have to make a large incision to use it. In contrast, if you set it up properly, a Yamane flange-fixated implant is generally well-centered at the end. After getting over the learning curve for the Yamane technique, I find that using it results in less worry about how the implant will settle at the conclusion of the case.”
Dr. Ayres points out that, like the other options, the Yamane technique has advantages and disadvantages. “There’s no need for multiple sclerotomies,” he says. “You don’t need peritomies, and it requires a smaller incision. Also, once you’re good at it, it’s pretty quick; you can often do a secondary IOL in 10 or 15 minutes. On the down side, it has a pretty steep learning curve. We often make it look easier in the videos than it is in real life. Also, tilt and decentration can be a challenge with the Yamane technique. Even in a carefully-measured-out surgical procedure, at the end the implant may not look right. That’s really frustrating, because there may not be an easy fix.
“The best cure for a poorly centered IOL with this technique is prevention,” he continues. “We do our best to make sure the lens is centered by being very careful with our measurements and making sure our sclerotomies are even on both sides of the eye. But if you do end up with the implant not properly positioned, you might be able to pull one haptic a little further out, recut it and melt the end to create a new flange. However, this may not always fix the centration, and then you have to redo the procedure. That could mean cutting off the flange, pulling the implant back into the eye, moving the incision and externalizing the haptic again.
“Doing this is challenging and frustrating,” he adds. “That’s when you tend to get kinks and broken haptics. There have been times where it was so bad I just said, ‘Forget it,’ and we took the implant out, and tried again with a new one.”
Yamane Pearls: Setting Up
Surgeons offer these suggestions to ensure the surgery goes well:
• Use an IOL with flexible haptics. “In theory, almost any three-piece IOL will work with this technique,” Dr. Ayres says. “However, most three-piece implants available in the United States have haptics made of PMMA, which is a stiff plastic that can break if it’s bent or kinked. So, we prefer to use Zeiss’ CT Lucia 602 implant, not because the optics are necessarily better, but because its haptics are made of polyvinylidene fluoride. PVDF is very flexible, and the haptics are resistant to breaking and kinking. That makes it very durable in this situation.”
• Do a complete vitrectomy. “When this technique was first described, the patients had had a full pars plana vitrectomy,” Dr. Devgan points out. “Studies have shown that patients undergoing the Yamane technique have an unusually high risk of cystoid macular edema.2,3 The Yamane technique involves twisting and turning the lens inside the eye, which can lead to strands of vitreous becoming entangled in the lens haptic or optic. That ends up putting traction on the macula, which can cause CME or even a retinal detachment.
“Today, surgeons sometimes use this technique with just a little bit of an anterior vitrectomy,” he continues. “That may not be sufficient. We need to do a core vitrectomy to avoid these complications. That’s why it’s often better to refer a patient who needs to have a lens fixated to your vitreoretinal colleagues.”
• Consider using a sub-Tenon’s block. “When I’m doing a Yamane IOL I deliberately use a sharp needle block to minimize chemosis and excessive hemorrhage, as opposed to my usual scleral cut-down and peribulbar block with a blunt cannula,” notes Dr. Mandelcorn. “That makes visualization of the sclera easier and helps when I’m making my scleral tunnels.”
• Consider adding an angiocath cap to your needle instead of a syringe. “It’s important to keep the eye pressurized with infusion to facilitate creation of scleral tunnels with the same orientation and angle on opposite sides,” explains Dr. Mandelcorn. “If the needle doesn’t have a cap on it, the infusion can leak out through the needle, leading to a soft eye. Putting a cap on each needle maintains a closed system and makes the technique easier.”
The AC-IOL Option “An anterior chamber IOL can be a good alternative in these situations, especially for older patients in their 80s or 90s,” says Efrem Mandelcorn, BSc, MD, FRCSC, a researcher at the Krembil Research Institute, University Health Network, in Toronto, and an associate professor at the University of Toronto. “Patients get their vision back very quickly and can often maintain good vision for the rest of their lives. Just remember a few basic pearls for AC IOL placement: — Do things in the right order. “Remove the dislocated IOL, place Miochol, perform an iridectomy, then place the AC-IOL,” he says. “An iridectomy prior to placement of the AC-IOL in the anterior chamber will prevent the iris from wrapping around the AC-IOL as a result of intraoperative pupil block. It makes things go much more smoothly.” — Be sure to place the right size IOL. “Once you’ve measured the white-to-white distance, add 1 mm,” Dr. Mandelcorn notes. “You don’t want the lens to be too big or too small.” — Place the iridectomy to the right of your corneal or scleral wound. “Haptics rotate clockwise, and you don’t want to incarcerate a haptic in the iridectomy,” Dr. Mandelcorn explains. “I’ve seen patients with chronic uveitis who have a haptic incarcerated in the iridectomy because the haptic was placed adjacent to the iridectomy. By placing the haptic to the right of your corneal wound as you rotate the AC-IOL clockwise, you minimize the risk of the haptic going through the iridectomy.” —CK |
Yamane: Performing the Surgery
During the surgery:
• Compare the bends in the needles outside of the eye. “When I’m bending the TSK needles, I compare them outside the eye before I place them, to ensure that the bend is at the same angle,” says Dr. Mandelcorn. “This helps to maintain a consistent angle of the scleral tunnels on each side.”
• Consider making peritomies before inserting the trocars. “In retina, we do a lot of transconjunctival insertions of ports,” notes Dr. Rosenberg. “When performing Yamane, I make small local peritomies before I insert my 25-ga. trocars. That allows me easier access to closing the sclerotomies when I’m done.”
• Make sure the haptics end up secured at the same level on both sides. “You don’t really see where the 30-ga. needles enter the eye because you’re doing it transsclerally,” notes Dr. Donnenfeld. “If the needle is inserted a little bit more anterior or posterior on one side it will cause some IOL tilt. You also need to be sure the needle punctures are exactly 180 degrees apart.”
• Consider creating a paracentesis 180 degrees from the sclerotomy. “This will help to optimize the direction of your 25-ga. microforceps, so the haptic can be grasped parallel to the 30-ga. needle,” explains Dr. Donnenfeld.
• If iris capture seems possible, take steps to minimize the risk. “The risk of this is probably greater if the iris has undergone trauma in the past or just seems floppy,” notes Dr. Rosenberg. “If you suspect there’s a risk of iris capture, you can do two things. First, you can do a peripheral iridotomy during the case, which I now do routinely. Second, you can consider placing your sclerotomies a little bit more posterior than normal. I usually place them 2 mm posterior to the limbus, but if I’m concerned about iris capture postop, I might place them 2.5 mm back. The idea is that if the lens isn’t as close to the iris, there’s less of a chance that iris capture will happen.”
• Be careful during lens insertion. “Sometimes the inserter can damage the haptic of the lens during insertion,” Dr. Rosenberg explains. “That can lead to postop lens tilt, so it’s very important to make sure that the insertion is clean, and that you don’t damage the haptic.”
• Be careful if the cornea is cloudy or there’s blood in the eye. “Inserting the haptic into the hollow-bore needle can be challenging, particularly when visualization isn’t perfect,” Dr. Donnenfeld points out.
• Be very careful about the angles at which you’re holding the haptic and the needle. “You need to make sure that the needle and the haptic align properly so the haptic will slide easily into the lumen of the needle,” explains Dr. Ayres. “The haptic is about 150 µm wide and the lumen is 200 µm. That means that there’s only about 50 µm of ‘wiggle room’ for the haptic. If your angles aren’t right, the haptic won’t go into the lumen.”
• Consider using a different-gauge needle on opposite sides of the eye. “I place a 27-ga. TSK thin-walled needle on one side and a 30-ga. needle on the other,” says Dr. Mandelcorn. “I find that if I use a 30-ga. needle on both sides, the haptic is often very tight inside the lumen of both needles. I prefer to externalize one side at a time, although I know some surgeons pull both out simultaneously; having a little bit of movement in the needle lumen on one side avoids stretching the optic-haptic junction, which can lead to poor centration.”
• When grabbing the haptic with your forceps, be sure to grab it at the very tip. “This will help prevent the haptics from kinking,” explains Dr. Rosenberg.
• Hold onto the tip of the leading haptic (that already has a flange on it) when externalizing the trailing haptic. “This prevents internalizing the leading haptic back into the eye during the externalization of the trailing one,” Dr. Rosenberg explains.
• Make sure the optic is centered before cauterizing the haptics. “This will allow you to adjust the centration of the IOL by positioning the haptics prior to cauterization,” explains Dr. Donnenfeld.
• Turn off the oxygen before performing cautery. “There’s always a risk of starting a fire in this situation,” Dr. Mandelcorn points out. “There are three variables associated with intraoperative fire: high oxygen flow; any flammable substance around the site; and performing surgery above the Xiphoid bone. In this surgery, you’re three for three—you have a high oxygen flow, you have flammable substances like Weck-cel sponges and the drape, and the cautery is being done on the eye. With conscious sedation you have a whole tent of oxygen right where you’re administering cautery, so it’s very important to make sure that the oxygen is turned off to reduce the risk of a fire. Using a low-temperature cautery also helps to mitigate this risk.”
• Don’t make the haptic flange too large. “If you make your flange too large, the top of it may end up externalized outside the sclera and conjunctiva,” explains Dr. Rosenberg. “If that happens, you end up with a little visible nub. This may not cause any issues, but it doesn’t look great and it creates the potential for endophthalmitis by opening a route into the eye. Fortunately, if this happens, the conjunctiva will eventually grow over the nub—although that can take as long as a year.
“It’s best to avoid this by making sure your flange bulb isn’t too big, so it fits within the 27-ga. sclerotomy,” he concludes. “If you’re not sure if this is going to happen, you can use a suture to close the conjunctiva overlying the flange tip so it’s not exposed.”
Yamane: Finishing Up
Last but not least:
• If the IOL isn’t centered after using Yamane, try externalizing one haptic a little bit farther. Dr. Mandelcorn notes that it can be hard to grasp the haptic if it’s already tucked into the scleral tunnel. “In that situation I’d use a sharp-tipped 30-ga. needle and just edge it out,” he says. “Once it’s out of the tunnel you trim it with scissors, and then re-melt it and create a new flange. That’s probably the easiest way to deal with that situation.”
• If the IOL tilts after Yamane, use a Prolene stitch to resolve the tilt. “I’ve had a couple of cases in which the IOL significantly tilted despite the fixation,” notes Dr. Mandelcorn. “If that happens, one option is to remove the lens and start over. But another possibility is to pass a double-armed 10-0 Prolene suture through the sclera and behind the optic as a backstop to resolve the tilt. It’s like a secondary pseudo-capsule that helps to keep the lens aligned. I’ve also adjusted significant tilt by placing a 9-0 Prolene suture through a haptic and its overlying iris to iris-fixate one end.”
• Consider suturing any vitrectomy sclerotomies to reduce the risk of hypotony. Dr. Rosenberg notes that when he was first using Yamane, the eye would sometimes develop hypotony after the case. “You’re putting five holes in the eye,” he points out. “You’re creating three holes for the vitrectomy ports and two additional sclerotomies for the 27-ga. trocars used to perform Yamane. To compensate for that, I’ve transitioned to suturing my three sclerotomies from the vitrectomy ports. Doing that has definitely reduced my rate of hypotony.”
IOL Fixation: General Advice
These strategies apply to any fixation technique:
• Proceed slowly when fixating a lens. “When I’m teaching fellows to do this, I always tell them to slow their movements down significantly,” says Dr. Mandelcorn. “If you perform a step too quickly, or don’t pause to check it, you could break or bend something and your final result will be much worse.”
• Make sure you do a careful pars plana vitrectomy. “This should be done under direct visualization using a 25-ga. vitrector to separate the vitreous from the IOL,” says Dr. Donnenfeld. “Take care to avoid causing vitreous traction. It may help to use intracameral triamcinolone to demarcate the vitreous.”
• Always try to fixate both haptics. “Fixate both haptics to the sclera if possible,” says Dr. Hoffman. “If you fixate only one haptic, the other side of the IOL may eventually come loose, requiring a return to the OR.”
• Consider learning one of the new suture-fixation variations. Dr. Ayres notes that the latest variations on suture fixation, in which the externalized ends of the prolene sutures are melted to create a flange that keeps them from prolapsing into the eye (instead of melting the tip of the haptic) have some advantages.
“Tying a knot with a Gore-Tex suture and burying it in the sclera is kind of a pain,” he observes. “Just melting the end of a 4-0 or 5-0 Prolene suture is much easier. The Canabrava and McCabe techniques both use this idea. They’re worth considering as your surgical option in these situations.”
“The three major techniques used for scleral fixation are the glued IOL, popularized by Amar Agarwal, the Yamane techniques and the Canabrava technique,” says Dr. Donnenfeld. “The Canabrava technique uses an IOL with eyelets. Dr. Canabrava passes a 5-0 prolene monofilament suture through the eyelets of the IOL and externalizes them; then he creates an external flange on the end of the suture using cautery, very similar to the Yamane technique. The difference is that instead of externalizing the haptic you’re externalizing the 10-0 prolene which is attached to the haptic. I’ve noted that many retina surgeons like this technique and use it fairly often when they perform an IOL exchange.”
“I’m accustomed to working with Gore-Tex sutures, so I haven’t felt the need to adopt these variations,” Dr. Ayres adds. “But for some surgeons who may not be as familiar with Gore-Tex suturing, or don’t have access to Gore-Tex sutures, these newer techniques are very applicable. They reduce the spaghetti, meaning there’s less suture to twist or tangle in the surgical field. They simplify things a little bit.”
• Pick one technique that you’re comfortable with and then get very good at it. “Many different IOL-fixation techniques are available today,” Dr. Donnenfeld concludes. “They vary significantly in terms of surgical skill and results, but they all involve a learning curve. So it makes sense to get good at performing one technique first. Then you can try to expand your repertoire and learn other techniques as well.”
Dr. Ayres agrees. “Not everybody has the kind of patient volume that makes it worth being good at three or four different techniques for suture fixation,” he says. “That’s why it makes sense to find one that you feel comfortable doing and stick with it.”
Dr. Ayres is a consultant to Alcon, Zeiss and W. L. Gore. Drs. Donnenfeld, Hoffman, Hsu, Gupta, Mandelcorn and Rosenberg report no relevant financial ties to anything discussed. Dr. Devgan owns CataractCoach.com, a free teaching website, but reports no other relevant financial disclosures.
1. Shtein RM, Weikert MP, Li JY, et al. Intraocular lens implantation in the absence of zonular support: An outcomes and safety update: A report by the American Academy of Ophthalmology 2020;36:707-711.
2. Zheng H, Tsougranis G, Sanchez G, et al. Postoperative complication rates by haptic fixation distance from limbus in sutureless intrascleral intraocular lens fixation. IOVS 2022;63: 2866–F0003.
3. Rocke JR, Fry L, Atkins W, et al. Yamane sutureless scleral fixated intraocular lenses: The Victorian experience. IOVS 2019;60:2066.