Placement of secondary intraocular lenses is one of the more common procedures we perform as retina surgeons, so it’s important for us to be comfortable with the various techniques and to understand our options. Implantation of an anteriorchamber IOL, refixation of a dislocated IOL and scleral fixation of an IOL can each be an appropriate choice, depending on clinical factors such as patient age, ocular comorbidities and the mechanism of lens dislocation.1
In cases that require scleral fixation with sutures, nonabsorbable polytetrafluoroethylene (PTFE) monofilament suture (Gore-Tex; W.L. Gore) has largely replaced polypropylene (Prolene) due to its long-term stability. Although there are numerous methods for scleral fixation, the most common technique performed at our institution makes use of a Gore-Tex suture with either an Akreos AO60 IOL (Bausch + Lomb) or an enVista MX60 IOL (Bausch + Lomb). Each of these models provides stable four-point fixation. In this article, we review our technique for suturing these and discuss the pros and cons of each lens in this situation.
Sutured-lens Technique
Before performing vitrectomy and lens or IOL removal, create limited conjunctival peritomies nasally and temporally and use a toric lens marking set to mark the horizontal axis, in order to ensure proper sclerotomy placement and lens centration. Using calipers, mark the sclerotomy sites 4 to 5 mm apart, 3 mm posterior to the limbus, and centered around the horizontal axis. This positioning simulates in-the-bag placement, so standard IOL power calculation formulas can be used.
Place trocars (23-, 25-, or 27gauge)2,3 superonasally and superotemporally, and use the empty trocar needle to create inferonasal and inferotemporal sclerotomies parallel to the limbus. Inserting the trocars perpendicularly without tunneling facilitates the rotation of the knot in the PTFE sutures at the end of the case. The acrylic lenses are easily folded and can fit through a 3-mm clear corneal incision or scleral tunnel.
Next, remove the needles of the 7-0 CV-8 Gore-Tex suture, and bisect and loop the suture through the eyelets of the IOL before inserting it into the eye. It’s critical to keep the suture strands organized. Grasp one end of the first suture with Ahmed Micro-Graspers forceps (MicroSurgical Technology), inserted through the corneal incision, and pass it using the handshake technique to MaxGrip forceps (Alcon) that have been inserted through one of the sclerotomies. Then, externalize the suture, and repeat the same procedure with the other end, securing one side of the IOL.
Some surgeons also externalize one or both ends of the suture on the other side of the IOL before folding and inserting the lens. This leaves the final suture to be externalized after the lens has been inserted. The PTFE sutures can then be trimmed and loosely secured by tying the first portion of a 3-1-1 knot or a slip knot, and the tension can be adjusted to perfectly center the lens before securing the suture and rotating the knot into the superonasal and superotemporal sclerotomies.
Leaky wounds can be sutured, but be wary of severing the PTFE sutures, in order to spare yourself a frustrating lens retrieval within the vitreous cavity. Alternatively, a transconjunctival approach can be used, eliminating the need for peritomies at the start of the case. A video of a sutured AO60 lens using a trans-conjunctival approach not requiring a peritomy can be viewed here.
Lens Options
Your choice of intraocular lens will impact various aspects of the procedure, and each lens comes with pros and cons.
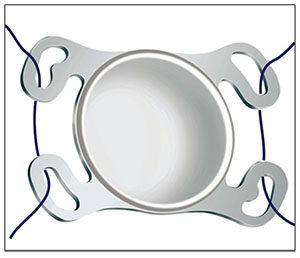 |
| Figure 1. The four eyelets of the Akreos AO60 (Bausch + Lomb) allow true four-point fixation. |
• Akreos AO60. This acrylic lens is a popular IOL choice for scleral fixation. It has four eyelets through which sutures can be looped, providing true, stable, four-point fixation. The benefit of this lens is its ease of use. Looping the sutures through the eyelets outside the eye (Figure 1) and externalizing the sutures before IOL insertion reduces the risk of crisscrossing sutures or flipping the lens.
Four-point fixation minimizes the risk of lens tilt, and the lens can be centered in the eye easily by adjusting the tension on the two sutures. (The lens can, however, bend or warp if sutured too tightly.) The major drawback of this lens is that it is composed of a hydrophilic acrylic material, and opacification can result from air or gas exposure. This opacification is rare, but if it occurs it may require a lens exchange. Take this into consideration in patients who have a high risk of retinal detachment. Such patients should be counseled regarding this risk.
• enVista MX60. The enVista MX60 is made with a hydrophobic acrylic material, so it’s not susceptible to opacification in the presence of air or gas. Although this lens has only two triangular eyelets at the haptic-optic junctions, these allow pseudo four-point fixation. If the suture is looped over the haptic, under the eyelet, and then back over the haptic (Figure 2), the intraocular lens will remain stable without tilt when the sutures are externalized.
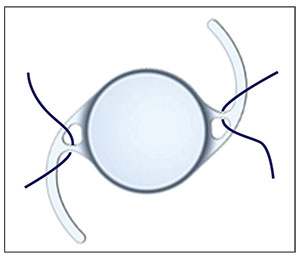 |
| Figure 2. Looping the suture around the optic-haptic junction of the enVista MX60 (Bausch + Lomb) creates a pseudo four- point fixation. |
The setup for this lens is similar to the setup that’s done for the AO60, with the sclerotomies being placed 3 mm posterior to the limbus and 4 or 5 mm apart.
Lens insertion is trickier with this IOL, as the suture can easily slip around the haptic and cause the lens to tilt. Make sure to keep tension on the externalized ends of the suture at all times to prevent the suture from looping back under the haptic. Folding the haptic inside the lens like a taco during insertion is one effective technique you can use to ensure that the suture stays properly positioned anterior to the haptic.
This lens is useful for patients with retinal detachment or those at high risk of needing air or gas tamponade.
Other Considerations
No matter which secondary suture techniques or IOLs you become comfortable with, it’s important to remember the basics of residency training and to carefully review lens power calculations on a case-by-case basis. Perform quality control checks to confirm reliable, up-to-date biometry measurements. Ensure that there are no discrepancies between axial lengths in the patient’s eyes, and check that the technician correctly adjusted the software for the status of the eye (e.g., is there silicone oil in the eye now, or will there be at the end of the case?).
We use the Barrett II Universal IOL calculation method, because biometry measurements taken by referring physicians typically don’t include calculations for our preferred IOLs. This approach has resulted in reliable refractive outcomes.
In conclusion, throughout our training and daily practice, we’re exposed to numerous techniques. The key to consistently good results, however, is to know a few techniques very well.
The more standardized the physician’s approach for each case, the more comfortable and confident he or she will be—and comfort and confidence are critical factors for maximizing visual outcomes. REVIEW
Dr. Aderman is currently completing a retina fellowship at Wills Eye Hospital in Philadelphia. Dr. Regillo is chief of the retina service at Wills Eye.
1. Stem MS, Todorich B, Woodward MA, Hsu J, Wolfe JD. Scleralfixated intraocular lenses: Past and present. J Vitreoretin Dis 2017;1:2:144-152.
2. Khan MA, Gerstenblith AT, Dollin ML, Gupta OP, Spirn MJ. Scleral fixation of posterior chamber intraocular lenses using Gore-Tex suture with concurrent 23-gauge pars plana vitrectomy. Retina 2014;34:7:1477-1480.
3. Khan MA, Kuley A, Riemann CD, Berrocal MH, Lakhanpal RR, Hsu J, Sivalingam A, Ho AC, Regillo CD. Long-term visual outcomes and safety profile of 27-gauge pars plana vitrectomy for posterior segment disease. Ophthalmology 2018;125:3:423.