The mid-face is one of the most important anatomic regions of the face from both a functional and aesthetic standpoint, and the ability to address mid-face problems is one of the key skills for the orbitofacial surgeon and oculoplastics specialist alike. It's also one of the most technically demanding. In this article, I'll share my tips for succeeding with this challenging procedure.
The Challenges of the Mid-face
There are three features of the mid-face lift that make it difficult:
• It requires the creation of a large flap; extensive dissection always creates a risk of ischemia, bleeding, scar contraction and infection.
• The buccal and zygomatic branches of the facial nerve travel through the flap, posing a risk of facial nerve paralysis.
• The pulling vectors and incisions of a mid-face lift are difficult to execute well; the mid-face cannot be simply lifted on a vector like the lower face, because you can't lift the canthi and eyelids off of their attachments. As a result, complex rearrangements are sometimes needed to address the recruited skin, retain a natural eyelid and canthal appearance and minimize visible scarring.
Approaches to a Mid-face Lift
You can accomplish vertical elevation of the mid-face tissues along various vectors and with different incisions.
Potential planes include the preperiosteal sub-orbicularis ocular fat, or SOOF, plane and the subperiosteal plane. The orbicularis plane presents the most risk to the facial nerve and isn't recommended except for unusual reconstructive cases (See Figures 1a and 1b).
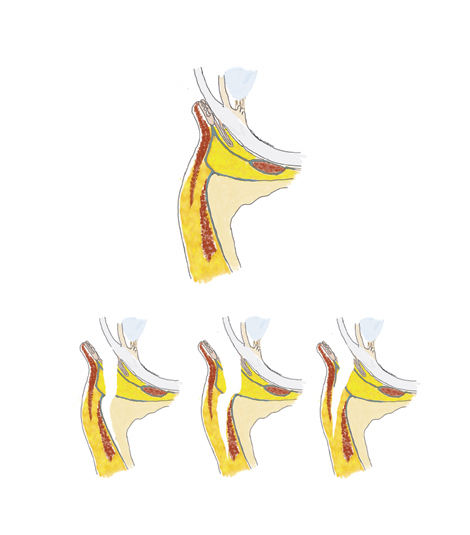 |
| Figure 1. A) Potential planes for mid-face lift include the subperiosteal plane, the SOOF plane and the subcutaneous (orbicularis) plane. |
Potential incisions include the transoral, transconjunctival, canthal, eyelid crease and temporal hairline. Since the incisions must be cosmetically acceptable, I believe the temporal incision is optimal, although the supra-brow incision can heal acceptably well in some patients and may be the best option for a man with a receding hairline. In my opinion, an incision through the lower eyelid or canthus is particularly dangerous, because of the potential "double whammy" of damaging the orbicularis and creating the opportunity for a full-thickness scar contraction.
Finally, fixation options include the orbital rim, malar hang-back and the temporalparietal.
 |
| Figure 1. B) The facial nerve is best protected in the subperiosteal plane. The green line shows the dissection plane and location of sagittal schematic. |
Both the temporal approach and the supra-brow approach have the added benefit of elevating the temporal eyebrow and lateral eyebrow fat pad. If the deep head of the lateral canthal tendon is left intact in its attachment to the orbital rim, there is minimal long-term elevation of the canthal angle. If you wish to elevate the lateral canthal angle, such as in the cases of congenital or iatrogenic canthal dystopia, then release of the deep head of the canthal tendon and associated canthal retinaculum will allow the canthal angle to rise with the flap.
Mid-face Lift, Step by Step
The surgery is performed under monitored local anesthesia with sedation. We block the supraorbital, orbitozygomatic and infraorbital nerves with 2% lidocaine with epinephrine, and achieve tumescent anesthesia of the upper face and mid-face with 200-300 cc of dilute lidocaine with epinephrine solution (0.1% lidocaine with 1:1,000,000 epinephrine).
• Starting the dissection. Using the temporal line as a reference, the temporal incision is designed so that the mid-face can be elevated along the vector from the angle of the mouth through the angle of the canthus. The incision is also designed to lay over the deep temporal fascia, so that this fascia can be accessed for flap fixation.
Carry the dissection down to the deep temporal fascia, identified by its shiny gray striated appearance. Carry out the dissection between the shiny gray deep temporal fascia and the overlying gauzy superficial temporoparietal fascia. Do this with direct elevation at first by lifting the flap with an angled retractor, and then under endoscopic visualization after the plane has been started. The facial nerve lies in the superficial temporoparietal fascia, so take care to maintain an accurate plane on the deep fascia to avoid injuring it.
• The conjoined tendon. On the medial edge of the deep temporal fascia, the frontal periosteum and deep temporalis fascia join together along the temporal line in an area referred to as the conjoined tendon. Dissect the conjoined tendon sharply, providing visualization of the frontal bone in the subperiosteal plane on the medial edge of the deep temporal fascia. Follow the conjoined fascia along the temporal line to the junction of the zygoma, dissecting at the same time the subperiosteal plane over the frontal bone medially, and the deep plane between the superficial fascia and the deep temporalis fascia laterally.
• Deep dissection. As you approach the superior orbital rim, the deep temporalis fascia splits into two layers, separated by the intermediate temporal fat pad (Yasargil's fat pad). Once you've identified Yasargil's fat pad, the appropriate plane of dissection is on the surface of the fat pad, which is the undersurface of the superficial layer of deep temporal fascia. Follow this plane down to the takeoff of the zygomatic arch, which can be palpated with the dissector before you see it.
A large Sentinel vein emanates from Yasargil's fat pad approximately 2 cm lateral to the orbital rim and approximately at the level of the superior orbital rim; find it and cauterize it with bipolar cautery. At the wider portion of the zygoma adjacent to the arch takeoff, the you will typically encounter the temporozygomatic neurovascular bundle; if possible you can let this hang across the dissection plane. Sometimes, however, it's impossible to avoid cutting the branch. Symptomatic numbness is almost never produced even if this nerve is cut, though.
After you recognize the zygomatic arch takeoff, carefully create a dissection plane in the subperiosteal plane over the arch. The frontal branch of the facial nerve crosses the arch approximately midway between the canthus and tragus, and can be damaged as the dissection is taken over the arch. A careful subperiosteal plane provides maximum protection for the facial nerve, which runs in the fascia fairly closely applied to the periosteum of the arch.
One of the most important features of the subperiosteal mid-face lift is the need for complete release of periosteum over the zygomatic arch. The periosteum must be released at least to the mid-point of the arch, and optimally to the lateral one-third junction of the arch adjacent to the zygomatic temporal suture.
• The masseteric muscle. After the periosteum is lifted off the arch, you'll see the aponeurosis of the masseteric muscle, identifying it as a striated fibrous band emanating from the inferior edge of the zygomatic arch (See Figure 2). It's not necessary to cut through the aponeurosis extensively or dissect over the masseteric fascia. In fact, the local branches of the facial nerve run over the masseteric fascia and are at risk during extensive dissection over the masseter. Rather, it's only necessary to loosen some of the attachments of the masseter along the inferior edge of the arch, releasing also the vertical attachments downward 2 cm onto the face of the maxilla.
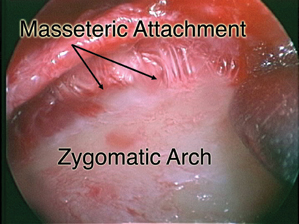 |
| Figure 2. An endoscopic view of masseteric attachments along the inferior border of the zygomatic arch. |
• The periosteal attachments. Once the attachments along the lateral orbital rim, malar bone, and zygomatic arch are released, the mid-face is held only by the periosteum over the maxilla. These periosteal attachments are not extremely firm in my experience. They can be released within the angled elevator, using cutting cautery (with care taken to avoid cutting into the plane of the facial nerve), or by inserting a long, thin scissors into the plane and gently spreading in the vertical direction to tear the periosteum. A sublabial incision can help you visualize these planes, but I don't find one necessary in the vast majority of cases.
• The final connections. Finally you can turn your attention to the lateral canthal angle and superolateral orbital attachments. The outer limb of the lateral canthal tendon is an area of tight attachments of the flap, and these must be released. Often, there is a tight attachment just below the canthal tendon, near the inferolateral angle of the orbit, coming up from the arcus marginalis. You can palpate these attachments with a fingertip or scissors, strum and then release them. You'll be able to see the deep limb of the lateral canthal tendon as the superficial attachments are released (See Figure 3). Leave the deep limb intact to minimize canthal dystopia. By grasping the eyelid, you can feel the deep tendon attachments and verify that they're still intact.
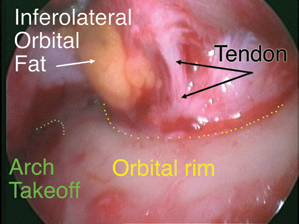 |
| Figure 3. An endoscopic view of the deep limb of the lateral canthal tendon. |
Often, surgeons will perform an endoscopic forehead lift simultaneously with a mid-face lift, so that the entire arcus marginalis is exposed and released through a central brow incision. However, even if you're only performing a temporal lift, it's still necessary to release the periosteal attachments along the arcus marginalis medially, to the area of the supraorbital neurovascular bundle. If you don't release the attachments around the superolateral and inferolateral orbit, the flap won't elevate and the surgery will have accomplished little.
Once the flap is mobilized, you can grasp the deep temporoparietal fascia with toothed forceps and elevate the entire flap so that the cheek rises. It's important to recognize that you can always grasp the skin and elevate the flap, but it's only when the deep layer will lift without resistance that the flap is mobilized enough to allow the surgery to be successful.
• Closing the case. Once you've adequately mobilized the flap, fixate it in an elevated position by placing a suture through the superficial temporoparietal fascia (SMAS) 1 cm inferior to the cut skin edge and suturing the flap to the deep temporalis fascia in an elevated position. You can place two sutures. Since the suture in the SMAS can dimple the skin; it's best to place it beneath hair bearing skin, and to try to place the suture bite in such a way that you minimize skin dimpling. I don't believe that a permanent suture offers any increased success compared to a long-lasting absorbable one, so I use an absorbing suture such as 3-0 Vicryl to make the attachments.
If your assistant manually elevates the flap to take tension off, it's easier for you to tighten the knot. Recognize, however, that it's useless to try to lift the flap under extreme tension—we all know that a surgical wound under tension will not heal. The flap must be adequately released so that the fixation can be accomplished under normal surgical tension in order for the surgery to be successful.
You can close the short temporal incision with surgical staples. If the incision was above the eyebrow, close it in layers in a standard fashion, taking care to evert the wound to decrease the chance of a depressed scar. We wash the hair with warm water and baby shampoo, and apply no dressings postoperatively. Moderate swelling is expected for two to four weeks, and the final results are seen at three months.
Cable Mid-face Lift
Subperiosteal mid-face lift, though effective at elevating the composite mid-face flap containing all of the various fascial, muscular and dermal elements, doesn't address changes within the flap that occur with age, such as loss of elasticity, loss of subcutaneous fat or cutaneous ptosis. Therefore, surgery that elevates these tissue planes makes sense theoretically. Unfortunately, lifting procedures that involve elevating skin or even the deeper SOOF plane against gravity don't produce long-term improvement, because the tissues tend to fall back to their original position.
An alternative, non-incisional technique to lift the soft tissues of the mid-face involves the use of long suture suspension, fixated to the temporalis fascia, also known as cable suspension. The idea of cable suspension is quite familiar to oculoplastic surgeons, who have used this technique extensively in eyelid suspension to the frontalis muscle for congenital ptosis. The cheek cable suspensions, which have been popularized by surgeons Greg Keller, Gordon Sasaki and Norman Shorr, provide a minimally invasive method to elevate the soft tissues of the mid-face. Suture suspensions can also be used to elevate the lower face and eyebrow.
Cable lift procedures are appealing to patients who are looking for ways to avoid traditional large incision and big flap operations. Cable lifts are often combined with other minimally invasive rejuvenative procedures such as sculpture by fat injection, Botox and skin rejuvenation.
Surgical concepts in mid-face surgery have evolved a lot over the past 20 years. As a result of this evolution, I prefer a subperiosteal plane and temporal incision for an aesthetic mid-face lift, and try to avoid eyelid or canthal incisions, since they have a higher risk of eyelid retraction or abnormal change in shape. Given time, this evolution may encompass surgeons' embracing of the cable lift, and we'll be able to offer patients long-lasting results.
Dr. Goldberg is chief of orbital and ophthalmic plastic surgery at the Jules Stein Eye Institute, and is an associate professor of ophthalmology at the UCLA School of Medicine.