The Surprise-prone
Though you might say the patient at highest risk for an unexpected refractive error postop is the type-A person who expects everything to be perfect, there’s not much you can do about that, so it’s best to focus on factors you can control. Sometimes, you can see a refractive surprise coming, as long as you know what to look for.
First, note that the patient most at risk for a postop surprise is someone with a shorter (less than 22 mm) or longer than normal axial length (26 mm or more). Patients with higher levels of astigmatism—in the range of 3 D or more—as well as those for whom the ocular surface was providing a source of measurement error, are also at risk.
Additionally, inconsistent measurements among your devices can lead to a postop error. Such inconsistencies include differences in the magnitude and axis of K values, or the average K value differing among your biometry, topography and manual keratometry readings. If such a discrepancy exists among all those devices, your refractive outcome becomes a bit of a crapshoot.
Finally, if a patient has been wearing rigid gas-permeable contact lenses for a long time and hasn’t been out of them for the appropriate length of time to let his corneas normalize, or he is a post-LASIK patient, he’s at risk for a refractive surprise.
Minimizing Risk
Here are some things you can do preoperatively to lessen the risk of a postop surprise:
• Address the ocular surface. Make sure that you optimize the patient’s ocular surface ahead of time. One of the biggest clues you can find that there may be a problem is on the placido disc image: Assess the quality of the pre-corneal tear film and the central corneal image capture. There should be sharp mires in the bull’s-eye and no smudged or missing areas that would be suggestive of some level of ocular surface disease. Even though staining and a rapid tear breakup time are going to be most commonly the result of dry-eye disease, don’t neglect the 10 to 15 percent of patients in whom this irregularity will be due to an epithelial condition, such as epithelial basement membrane disease or nodular degeneration. These irregularities can lead to inconsistent imaging that will really throw off measurement values, and a majority of what you see on topography won’t be accurate in terms of the magnitude of the K
 |
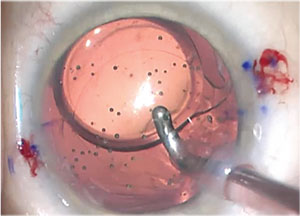
| Bimanual I/A is great to use to manipulate and dial a toric IOL into position. Engage the IOL at the haptic-optic junction, on irrigation only, and gently rotate the IOL into position. |
If you don’t have a placido-based topographer but instead use manual Ks and biometry, and those two technologies aren’t consistent, that should alert you to the fact that you have to pay close attention to the ocular surface. The inconsistencies could be due to a lid effect or another issue, but you need to find the source. To do this properly, make sure to bring the patient back another day when she has no drops instilled in her eyes and repeat the imaging. This is especially necessary if you’re trying to achieve a sharp refractive outcome.
• Measure the posterior corneal curvature. Being able to account for the effect of the posterior cornea, either with LED topography such as the Cassini or an online toric calculator that accounts for posterior corneal astigmatism such as the Barrett Toric Calculator, is key to a successful outcome. This will help you determine your astigmatic factor and decrease your residual postop error. Intraoperative aberrometry can also be helpful as a way to identify the total corneal astigmatism, especially if you don’t have a lot of advanced preop diagnostic tools. At this point, the Alcon VerifEye has over 500,000 data points to use as a reference. It can also use the postop result in a patient’s first eye to help refine the IOL selection process for his second. This can be very helpful, especially in the case of a post-LASIK patient.
• Counsel the patient. If you have one of these potentially challenging patients, spend some chair time preoperatively discussing how his particular situation might impact his postop result. Make sure he understands what your personal statistics are on this count. For me, for example, in an average eye I have a 92-percent chance of being within 0.5 diopter of the the spherical equivalent that I target. However, I tell him, if his eye falls outside that normal range with an axial length shorter than 22 mm preoperatively or he has had prior corneal refractive surgery, there may be upwards of a 20- to 30-percent chance that I won’t be able to accurately hit the target I aim for in terms of the vision he wants postop.
Though you can’t completely avoid having a dissatisfied patient, if you do the best preop diagnostics you can, and spend the time explaining things to the patient ahead of time, you can help reduce the risk that he’ll be dissatisfied later.
What Went Wrong?
Determining the cause of the postop surprise can sometimes help you correct it and avoid similar surprises in the future.
In the postop period after you discover the postop refractive error, make sure the patient finishes his postop drop regimen and that any inflammation has quieted. Since he didn’t hit his postop target, postpone the second eye’s surgery, and explain why, saying, “We want to fully handle your first eye so that you’re satisfied with its outcome before we move on to your other eye.” Bring him back a good one to two weeks after he’s finished his postop drops. If the patient needs a little handholding before then, don’t hesitate to bring him back in the intervening time period just to reassure him that you’ll be addressing the situation in due time.
You
 |
| With a toric IOL, sometimes an exchange isn’t necessary and a simple rotation will suffice. When the toric IOL is in or just shy of the final position, shift the IOL, and get behind it in order to carefully aspirate out all of the visoelastic. |
From a steroid standpoint, I’ll get either a compounded preservative-free dexamethasone or move him over to Lotemax ointment at night or b.i.d. It’s better to have transient blurred vision from the ointment than the potential toxicity from preservatives. This is especially true if it’s a patient whose ocular surface was somewhat dry to begin with or who was already on other drops such as glaucoma medications, which can put him at risk for developing postop dryness.
In this ocular surface evaluation, look at the lids, the tear-film breakup time and vital dye staining. Of course I look at more than just staining, but I want to see how the surface looks during a certain timeframe compared to preoperatively. At least a third of my cataract patients will develop some transient exacerbation of their dry-eye disease.
Make sure to get a very good refraction, particularly if the patient had a toric IOL implanted, because you want to know exactly the refractive magnitude and axis of astigmatism. This will help you determine what to do with any astigmatic surprises after a toric IOL implantation.
Next, I perform all the normal imaging. I repeat the biometry and topography—including use of the Cassini. Then, I always get macular imaging, because I want to rule out any macular pathology, since you never know for sure unless you check. I also get another manifest refraction. I make sure that, in cases of postop refractive surprises, all of the refractive workup is performed by a LASIK technician. This is because we have certified ophthalmic medical technologists who do all of our LASIK evaluations who are more experienced, and their manifest refractions are simply more accurate than other techs’.
I review all of this data and the tech’s notes before I walk into the exam room. From the notes I try to get a sense of the patient’s level of satisfaction or anger, so I can be prepared to provide the emotional support the patient needs. It’s at times such as these that your emotional quotient can be just as important—or more important—than your intelligence quotient for these unhappy patients. Talk to the patient and really listen to her complaint. Find out if she’s achieving any point of clarity, if there’s fluctuation in the vision, and whether or she’s really bothered by potential side effects.
Regarding the presbyopia-correcting IOLs, we all know that there can be associated night vision symptoms, based on the advanced optic design of the extended depth of focus and multifocal IOLs. One point that’s important to make here is that I don’t specifically ask about side effects such as starbursts and halos. I don’t want to put those ideas in patients’ heads, but instead want them to voluntarily give me that information. If they do, then I know it’s a true issue. All patients are aware of the potential for having night vision symptoms, and it goes without saying that these potential concerns should be fleshed out while I’m meeting with the patient preoperatively.
Dealing with the Error
The best option for dealing with a postop refractive error depends on the error itself and the lens the patient had implanted. An overarching theme, however, is that your choice is guided by three things: the severity of the refractive error; the level of the patient’s dissatisfaction; and the patient’s tolerance for waiting the requisite three months for full healing before you’d consider laser vision correction.
• Milder surprises. Take as an example a postop patient with a small amount of mixed astigmatism after cataract surgery. In this patient, her spherical equivalent is close to emmetropia and she has less than 1 D of residual astigmatism. This is the kind of patient for whom the best course of action is just making sure she’s finished with her drops and her refraction remains consistent. Two or three months after cataract surgery, her error can easily be fixed with a relaxing incision.
In terms of a good nomogram for these incisions, I use the same nomogram that I’d use preoperatively, which is a fine-tuned version of the Koch nomogram that accounts for posterior corneal astigmatism. In general, I make my primary corneal relaxing incisions with femtosecond laser technology at 85-percent depth and a 9-mm optical zone.
For a postop relaxing incision, though, I may adjust my nomogram based on how the patient responded to any previous LRIs. Therefore, if my normal 40-degree arc, which corrects about 0.5 to 0.75 D of cylinder in my hands, didn’t reduce the patient’s astigmatism that much preoperatively, when I create my second arc I’ll place it in the opposite axis 180 degrees away. I’ll adjust the length based on the results of the initial LRI, making it longer or shorter as needed.
Also, when performing an LRI postop, I may place it a little more central than the first one. So, if I was in the 9-mm optical zone to begin with, I may reduce that to 8 mm, because the more central and deeper you go, the greater the relaxing effect on the cornea.
Also, if your surgery has flipped the astigmatic axis (for example, the toric IOL is at 90 and the patient’s refractive astigmatism ends up being 1 D at 180 degrees), the patient will respond less favorably to an LRI at 180. At that point, the optical system just becomes too complicated, in my experience, because you’ll be correcting astigmatism on the cornea that’s steep in the exact opposite axis of the astigmatic
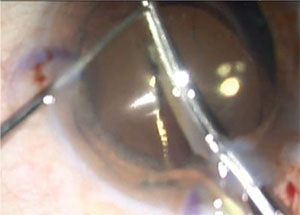 |
| IOLs can be explanted in different ways. Acrylic IOLs can very efficiently be stabilized with a Sinskey hook over the optic, capturing the optic nasally. Intraocular scissors can then be used to carefully transect the optic into two halves. Use plenty of viscoelastic over the optic, in order to protect the endothelium and create space between the optic and endothelium. |
• Higher astigmatism. However, if the patient has an astigmatic error that’s not just mixed astigmatism, or has an astigmatism value of 1.5 D or greater, this falls into the range that won’t be well-served by performing an LRI. With a relaxing incision, any arc greater than 40 to 45 degrees is too large. It can destabilize the cornea, cause irregular astigmatism and intensify dry-eye issues. For me, then, if the astigmatic refractive error is 1.5 D or greater, I’m considering three options: laser vision correction; possible rotation of the toric IOL; or IOL exchange.
To aid my decision on which route to take, I’ll go to astigmatismfix.com and plug in the patient’s manifest refraction and see if I can rotate the lens. If I find that I can move it more than 5 degrees from its current position and have an appreciable effect so that the net residual astigmatism is pretty low, I’ll definitely take him to the OR in order to take care of that, fairly early in the postoperative period. Patients whose refraction can be corrected with repositioning of a toric IOL respond very favorably, with a greatly improved quality of uncorrected vision afterwards, if the IOL reposition results in a postop refractive astigmatism under 0.5 D. For multifocal lenses, however, in my experience anything over 0.25 D of residual refractive astigmatism actually leads to a decline of a line or more of vision, and should be corrected to optimize the patient outcomes.
• Considerations for LVC. If the spherical and/or astigmatic errors are high, and the patient is willing to wait 90 days, you can successfully perform laser vision correction. This is a particularly attractive route if you or the patient aren’t comfortable performing an IOL exchange.
The 90-day waiting period is crucial, because there have been cases in which the suction from the femtosecond flap-making laser actually burps the wound and causes decompression of the anterior chamber. You want stabilization of all those components. Also, though it’s uncommon, some patients can have a greater level of fibrosis in their astigmatic relaxing incision(s), and the effects of their astigmatic correction can change between two weeks and three months postop. With this being the case, you want to reach a steady-state so that their refractive error remains consistent between visits.
Since my cataract incision arcs are at a 9-mm zone, when I create a LASIK flap I make it 8.5 mm. This generally doesn’t intersect or cause issues with the temporal wound, because the wound is fairly peripheral and has usually healed well.
The other important consideration when approaching LVC in these patients is whether the patient has a multifocal IOL. If you’re treating a MF lens patient with custom LASIK, you’ll notice that his refraction from the various image captures will be very inconsistent. This is because the aberrometer is trying to get a reading through the IOL’s various rings. So, for my MF and EDOF lenses, I perform a straightforward, standard, non-wavefront-guided LASIK, based on a careful manifest refraction.
If the patient isn’t one to wait, though, you can perform an IOL exchange sooner, or refer him to someone who can do the exchange.
Tips for Lens Exchanges
If you’re going to perform a lens exchange, know that they can be readily done in the early postop period. Beyond the usual risk of infection, you can perform the exchange safely with no disturbance of the capsular bag, and with great outcomes. To help get the best results, though, here are some tips.
First off, if you’re in the refractive-cataract surgery space but haven’t performed a lens exchange yet, it’s best to get comfortable with the mechanics of it.
To help become accustomed to the procedure of exchanging a lens, the next time you’re in the OR with any cataract patient, once you inject the lens into the eye and dial it into the bag, take some time to practice using the Sinskey hook to deliver the haptics out of the bag and lift it a little bit into the sulcus and the anterior chamber just to get the feeling of what it’s like to perform an exchange. This is helpful because the technique is very similar to that used in an actual IOL exchange in the early postop period.
When performing an actual lens exchange, if it’s early on in the postop period, you can usually use your Sinskey hook to open your primary and secondary wounds pretty easily. For an exchange, I usually make a secondary paracentesis 180 degrees away from the first one, because it helps to come at the lens from different angles. This is especially true when you’re trying to re-inflate the capsular bag; it just makes it a lot easier and less awkward in terms of positioning. Ultimately, I have paracentesis openings at 12’oclock and 6 o’clock; along with my temporal primary wound.
Generally, I don’t use a dispersive viscoelastic, though I know there are others who do. I prefer a cohesive viscoelastic for the entire procedure. Early on in the case, you can generally leave it on the cannula and get under the optic-haptic junction to viscodissect the anterior capsule leaflet off of the optic-haptic edge. In some cases, however, you’ll find that a little bit of fusion has occurred, and it may be difficult to achieve this viscodissection. In that case, it’s easy to come out with the cannula and exchange it for a 27- or 30-ga needle. I engage under the anterior capsule, bevel down, on a viscoelastic syringe, and gently inject along the optic surface to create enough space to separate the actual rhexis edge off the lens. I then quickly come back out and exchange the needle for the appropriate 27- or 30-gauge cannula—which is nice and blunt—and get back into the space.
At that point, I attempt to re-inflate the bag and, as I’m reinflating it, I try to inject the viscoelastic down the actual haptic itself to make sure I separate as much as I can. In many cases, the IOL I’m trying to remove is a one-piece acrylic, which has a terminal bulb on the haptics. These bulbs can develop little fibronectin bands that can keep the IOL stuck in the equator of the capsular bag. One important pearl here is that you can end up overinflating the bag, which can create a posterior capsular rupture. So, as you do this maneuver, be cognizant of pushing/tapping the IOL down to release some of the viscoelastic that’s stuck behind the optic, letting it come forward. Then, burp this viscoelastic out of the eye so that you actually have some potential space where you can deposit the fresh viscoelastic.
If it appears that the repeated movements involved with getting under the anterior capsule in different spots and reinflating the bag have opened it, use a Sinskey hook—or the instrument of your choice that has some form of hook—and see if you can rotate the lens. If the lens appears mobile, you have two options: You can get behind the lens with your hook, such as in the crook of the haptic-optic junction, and try to lift the IOL out of the bag and then dial the rest of the lens out; or you can actually pull the optic to one side enough to see where the actual shoulder of the haptic is so that you can then creep under the anterior capsule, engage that shoulder and lift it out of the bag. Once it’s lifted out of the bag, you can get the optic with either a Sinskey hook or intraocular forceps, dial it, and then pull it up into the anterior chamber. Once it’s in the chamber, make sure you have some viscoelastic to keep the IOL from touching the endothelium. In some cases, the terminal bulb of the haptic will not be mobilized, despite your best efforts. In that case, the haptic should be transected while the forceps gently pull the optic centrally, and intraocular scissors are used to transect the haptic as peripherally as safely possible.
When you’re ready, there are a couple of ways to remove the lens. Some surgeons choose to come across and actually fold the lens within the eye. I find this to be a little cumbersome, though, especially for a shorter eye. The technique that works for me involves stabilizing the lens, externalizing the haptic and ensuring that I have an adequately sized temporal wound. I usually have a 2.2-mm primary cataract wound that I’ll extend to about 2.5 or 2.75 mm for an IOL exchange. I stabilize the optic with my second instrument, and I prefer to use intraocular scissors by MST to cut the optic in half. I then externalize and remove each half. At this point, some surgeons will even inject the replacement IOL into the bag in order to keep the bag protected. As long as you have good space within your temporal wound, chances are you won’t burp the wound and lose viscoelastic in the process, and you’ll have plenty of room to work inside the eye with your scissors and intraocular forceps while maintaining a very steady chamber.
• Thoughts on piggybacking lenses. A piggyback lens implantation can be done if you’re simply correcting the spherical equivalent, because there are no piggyback lenses for astigmatic correction. That being said, I don’t do piggyback lenses very often. Since the Staar silicone lens isn’t available, we have few choices for a piggyback procedure. The Staar CQ2015 collamer lens is great because it’s also got a rounded edge, but it doesn’t come in the low powers I need for piggybacking. The Rayner lens, which is said to be a great piggyback option because it’s non-acrylic and doesn’t have a rounded anterior edge, isn’t available in the United States.
The only other real options include the B+L LI61AO series and the AMO Sensar AR40 E series. The B+L series of lenses is nice because those are silicone three-piece lenses but, unfortunately, they have a square edge that can lead to chafing and chronic inflammation. If you’re doing a piggyback operation and your primary lens wasn’t acrylic, a good option is the Sensar, thanks to its rounded anterior edge, and the available low-power range.
In the end, no one likes a refractive surprise after cataract surgery. If you follow some of these tips, however, you can handle the surprise well and give your patient the outcome she wants. REVIEW
Dr. Yeu is a cornea, anterior segment and refractive surgery specialist, and an assistant professor of ophthalmology at East Virginia Medical School. She is a consultant for Cassini, Alcon and AMO.