Design and Patient Selection
The KAMRA inlay uses the simple pinhole technique to improve reading vision by focusing light as it enters the eye. As a result, unlike monovision LASIK, the KAMRA provides depth of focus. Covered with 8,400 microscopic holes, the 3.8-mm circular inlay is also able to allow oxygen and nutrients to flow into the eye after implantation.
 |
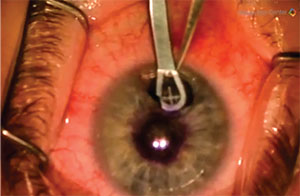
| Combining LASIK with KAMRA can allow more patients to receive the inlay. Here the KAMRA insertion site is visible beside the flap. |
The KAMRA inlay is intended to be placed in the non-dominant eye of patients between the ages of 45 and 60 years old. The Food and Drug Administration states that the inlay works best for those patients who have between +1 and +2 D of presbyopia and who do not already require distance vision contacts or glasses. We aren’t aware of any restriction regarding the size of the pupil.1
Despite promising results, this device is not a cure-all solution for reading vision, however. Consequently, we wouldn’t recommend that this inlay be placed in anyone who will be doing prolonged reading for professional reasons, such as data analytics on a computer, text editing, etc. We do recommend this inlay for patients who would like to do occasional reading while still maintaining a depth of focus, such as reading text on a phone or a newspaper. As a result, before conducting the KAMRA surgery, it is especially important that you give patients a thorough informed consent in order to establish realistic expectations for the KAMRA, including the results of the FDA clinical trials mentioned below.
Implantation Procedure
The standard procedure for KAMRA implantation follows five steps. Here, we’ve adapted and summarized these steps from the FDA instructions:
First, to prepare the non-dominant eye for implantation, you create a miotic pupil 30 to 60 minutes before beginning the procedure to allow the full pupil diameter to be visible. Second, using the first Purkinje reflex or the center of the pupil, you mark the cornea with a 4- or 4.5-mm ring marker. There are numerous diagnostic devices that can help you preoperatively identify the center of the pupil vs. the Purkinje reflex. We recommend the use of AcuTarget HD by AcuFocus. However, surgeons may use such devices as the OPD Scan III, iTrace or Vario to help guide them in surgical planning for proper centration. Note that this initial marking of the patient’s cornea is essential for centration. The surgeon must use enough marking ink to last through the pocket creation and the eventual inlay implantation; otherwise he may lose the desired landmark during the procedure.
If the distance between the Purkinje reflex and the center of the pupil is less than 300 µm, you should use the Purkinje image as your center. If the two are more than 300 µm apart, you should center the mark halfway between the center of the pupil and the Purkinje reflex. Although there are studies showing that centration with respect to the pupillary axis or Purkinje may not have a large impact on the visual outcome, a well-done article published last year recommended that we use the first Purkinje reflex for the centration of the KAMRA for the majority of our cases.2
 |
| When inserting the KAMRA, move it slightly past the centration point and pull it back into the proper alignment. |
Third, after centration and marking the cornea, you use a femtosecond laser to create the inlay pocket 225 to 250 µm deep, using a maximum spot-line separation of 6 µm by 6 µm. We prefer to create deeper pockets beyond 40-percent thickness of the cornea, preferably 225 µm or thicker, as long as the residual stromal bed is at least 250 µm. There are three approved laser platforms in the United States that can provide pockets for the implantation of the KAMRA inlay: the Alcon FS200; Ziemer Femto LDV; and the AMO IntraLase iFS.
The IntraLase, FS200 and Ziemer lasers create pockets of 4.7 mm, 5.0 mm and 6.5 mm, respectively. Although we have found that 4.7 mm is an ample amount of space for the inlay, compared to the IntraLase, the 5.0 mm FS200 channel is larger and does allow more room and freedom in terms of mobility when the forceps and KAMRA are in the pocket. Another potential advantage the FS200 may provide is that you can place the KAMRA in a meridian desired by the surgeon; it doesn’t need to be along the 180-degree axis. Some people may prefer to have the pocket created superiorly for easy accessibility, especially if the surgeon is sitting superiorly.
The Ziemer Femto laser has the largest channel width at 6.5 mm. Although this large size may not be entirely necessary, it’s a very friendly platform for surgeons who are used to handling a microkeratome instead of a femtosecond for their laser surgery. You also have the additional advantage of using your desired surgical microscope, which may have better optics and visualization.
When you’re docking your femtosecond laser, it’s usually recommended that the suction ring be placed more laterally, with a larger amount of temporal scleral show. Such intentional decentration will enable you to place the incision site of the pocket closer to the limbus, reducing the risk of induced astigmatism. It’s also strongly recommended that when you are creating your pocket, you size it in such a way that the centration of the inlay is limited by the width of the pocket.
There are some intraoperative centration marking devices such as the Mastel Centration Ring that can help you to choose the proper alignment intraoperatively by having the patient fixate on the centration light. Some surgeons also use the Alcon/WaveLight Allegretto 400Hz or the AMO/VISX S4 platform to aid them with the centration of the KAMRA implantation. However, the WaveLight Allegretto EX 500Hz can’t be used for centration. We use the iFS laser for the creation of our pockets, but when it comes to the implantation, we use a surgical microscope combined with the Mastel Ring for better visualization, as well as for reliable centration.
We strongly recommend that you save the preop planning printout of the image of the distance between the Purkinje reflex and the pupillary center and mount that image on your microscope in the proper orientation to help guide you during the surgery.
Next, open the pocket using a Sinskey hook and dissect it with the dissector. Make sure the entire pocket is dissected before attempting to implant the KAMRA inlay. After opening the pocket, you insert the KAMRA into the pocket using the forceps. When you’re stabilizing the inlay with the forceps, you only want one-quarter of the inlay edge exposed. Move the KAMRA slightly past the centration mark and then pull it back into the necessary alignment. Let the inlay rest for about three seconds before withdrawing the forceps from the eye. You can use a surgical microscope or excimer laser to visualize the implantation, although we believe that a surgical microscope has superior optics.
Based on our initial experience and implanting nearly 90 cases after the FDA approval, we recommend that you make the pockets as deep as possible. This will reduce the risk of hyperopic shift three to six months after the surgery.
Postop Instructions
After you’ve implanted the inlay, there are some things you can do postop to get the best results.
The original FDA recommendations state that patients be given topical antibiotics four times a day for a minimum of one week, artificial tears q.i.d. for up to a month, as well as topical corticosteroids q.i.d. for the first week, t.i.d. for the second week, b.i.d. for the third week and q.d. for the fourth postoperative week.3 However, in our experience, we’ve found that patients need to be on topical corticosteroids longer than was originally recommended. We currently keep them on topical 1% prednisolone q.i.d. for three weeks and subsequently switch the patients to 0.1% fluorometholone q.i.d. for one week. We then taper to t.i.d. for three weeks, b.i.d. for three weeks and q.d. for three weeks, and then once every other day for an additional three weeks. There are also some patients who may need to be on a low dose of steroids twice per week for an extended period of time. These are the KAMRA patients that developed hyperopic shift after four months. We recommend that patients between two and four months postop be followed to target individuals who may need to be on a low dose of steroids to prevent this hyperopic shift.
Safety and Efficacy
In the FDA clinical trials for the KAMRA inlay, before surgery, none of the 508 patients were able to see 20/40 uncorrected at near out of the surgery eye. At 12 months after surgery, 83.5 percent (399/478) of the patients saw at that level.4 Before implantation of the inlay, 43.3 percent (220/508) saw 20/40 at near binocularly, uncorrected. After surgery, 91.8 percent (406/436) were 20/40 or better binocular uncorrected at 12 months.3
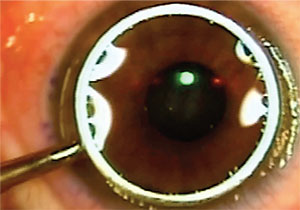 |
| In simultaneous PRK and KAMRA, the surgeon centers and implants the KAMRA as usual, and then follows with epithelial removal (shown here is the alcohol well) and PRK. The inlay is visible in the center of the image. |
LASIKamra and PRKamra
Many physicians will recognize that a large number of patients who could benefit from the KAMRA inlay also suffer from myopia or hyperopia with or without astigmatism. For such patients who wish to receive the inlay, consecutive LASIK/KAMRA and PRK/KAMRA could be a justifiable choice. In addition, many practitioners have implemented the simultaneous approach of PRK and KAMRA or LASIK and KAMRA instead of using the two-step approach, and further studies are being conducted as to their predictability and outcomes. These procedures have the potential to be much more convenient for the patients, since patients wouldn’t have to go to the operating room twice and combining procedures would limit the amount of patients’ steroid use to just one treatment course instead of two. In each procedure, it’s recommended that the refractive error in the non-dominant eye intentionally be undercorrected for a target of -0.5 to -0.75 D in patients that undergo PRK or LASIK in both eyes. Here is a description of these surgical approaches:
• Consecutive PRKamra and LASIKamra. If patients wish, we can correct the refractive error with PRK or LASIK. Then, at another date, usually one to three months after the original surgery, they can undergo KAMRA implantation. This two-step approach to LASIK/KAMRA and PRK/KAMRA has shown good predictability, safety and efficacy in our practice, based on short-term results.
• Simultaneous PRKamra. Our method for simultaneous PRK and KAMRA involves the same steps of centration and implantation of the KAMRA inlay as before, followed by the alcohol and epithelial removal of PRK (a video of this can be viewed at https://youtu.be/CcWJpFwgS0M). The preliminary results on this simultaneous procedure have been good, but we do not yet have a large enough sample size to evaluate the effectiveness in terms of six- and 12-month data. The scientific literature supports our belief that it should work effectively.
We’ve come to the conclusion that if you use the KAMRA inlay with PRK in the non-dominant eye, since the patient will require a similar postoperative course of topical corticosteroids for three to four months for both the inlay and PRK surgeries, the treatment will be very similar if we do the procedures simultaneously. Thus, as noted earlier, by combining the two procedures, we save the patient time and he receives steroids for just one period rather than two.
• Simultaneous LASIKamra. We have found that simultaneous LASIK and KAMRA is also a viable way to bring patients into the range of use for the KAMRA inlay. Previously, physicians would create the corneal flap and place the KAMRA inlay under the flap.5 However, with our understanding now of deeper insertion’s benefits, some physicians have already tested methods of simultaneous KAMRA and LASIK with the inlay implantation in the corneal pocket occurring first, followed by the laser ablation of the eye.
We take a different approach. Our method for this procedure involves the laser ablation of the eye first and the KAMRA implantation second in order to prevent the KAMRA inlay from confounding the pupil tracker on the laser. Because the implantation of the inlay may not always be in the proper position, we think that proceeding with the ablation first prevents any confusion. In addition, we believe that the simultaneous procedure should involve a short waiting period to vent the corneal pocket for the inlay before creating the corneal flap in the same eye, in order to ensure a smooth bed for the laser ablation (to view a video of this, visit https://youtu.be/GZUvXMUyS7M).Like PRKamra, we don’t yet have a large enough sample size to evaluate the effectiveness in terms of six- and 12-month data, but the preliminary results have been promising.
Overall, we believe that corneal presbyopic devices such as the KAMRA, and now the recently approved Raindrop, are important approvals for the baby boomer generation’s particular vision needs. However, there is still a need for collaboration on studies into such devices’ predictability, postoperative care and long-term results, and we look forward to conducting further research studies on these topics. REVIEW
Dr. Moshirfar is an adjunct professor of ophthalmology at the John A. Moran Eye Center at the University of Utah. Mr. Wallace is a clinical research assistant at Hoopes, Durrie, Rivera Research in Draper, Utah. They have no financial interest in the products mentioned.
1. Tomita M, Kanamori T, Huseynova T, Waring IV GO. Retrospective evaluation of the influence of pupil size on visual acuity after KAMRA inlay implantation. Journal of Refractive Surgery 2014;30:7:448-53.
2. Corpuz CC, Kanamori T, Huseynova T, Tomita M. Two target locations for corneal inlay implantation combined with laser in situ keratomileusis. Journal of Cataract & Refractive Surgery 2015;41:1:162-70.
3. KAMRA Inlay: Professional Use Information. 1st ed. Irvine, CA: AcuFocus, Inc.; 2015. http://www.accessdata.fda.gov/cdrh_docs/pdf12/P120023d.pdf
4. Facts You Need to Know About the KAMRA Inlay Implanted for Improved Near Vision for Patients with Presbyopia: Patient Information Booklet. 1st ed. Irvine, CA: AcuFocus, Inc.; 2015. http://www.accessdata.fda.gov/cdrh_docs/pdf12/P120023c.pdf
5. Tomita M, Kanamori T, Waring GO, Yukawa S, Yamamoto T, Sekiya K, Tsuru T. Simultaneous corneal inlay implantation and laser in situ keratomileusis for presbyopia in patients with hyperopia, myopia, or emmetropia: Six-month results. Journal of Cataract & Refractive Surgery 2012;38:3:495-506.