Goniotomy is a popular MIGS choice for many surgeons since it can be done as a standalone procedure or in conjunction with cataract surgery, has a low upfront and per-case cost (if using a manual blade such as the Kahook Dual Blade), and provides a safe and effective way to lower intraocular pressures without blebs or implanted devices. Jonathan S. Myers, MD, a professor of ophthalmology at Sidney Kimmel Medical College at Thomas Jefferson University and chief of the Wills Eye Hospital Glaucoma Service in Philadelphia, notes that “for many clinicians who aren’t glaucoma specialists or who don’t predominantly see glaucoma patients, it can be easier to have one go-to procedure rather than six different procedures that they’re not going to do often.”
Here, surgeons share their pearls for performing a successful goniotomy.
Choosing Good Candidates
Patient selection for goniotomy involves many factors, explains Dr. Myers. “Patients fall into a couple groups,” he says. “Some patients might have relatively mild or moderate glaucoma but a diagnosis that precludes the use of a device such as an iStent or Hydrus. A goniotomy may make sense for them if they’re close to their pressure goal and the primary reason I’m doing goniotomy is to reduce their medication burden or lower their pressure just a few points.
“Patients who have secondary glaucomas and are generally younger may be good candidates for goniotomy as an alternative to filtering surgery when they need a substantial pressure reduction,” he continues. “For these patients, there’s a better chance that goniotomy can give them this substantial pressure reduction compared with routine geriatric POAG cases that need pressures reduced from, say, 30 to 15 mmHg. Those results are often disappointing.”
He says that patients who have a high risk for postoperative bleeding in the first week or later on in life may be poor candidates for goniotomy. “Those patients may do a lot of Valsalva-type maneuvers for weightlifting or have issues that trigger Valsalva such as chronic cough or obesity,” he says. “Goniotomy also isn’t my first choice for patients taking strong blood thinners or those who have only one eye. There’s a fair chance of hyphema in the first week after goniotomy which can substantially reduce vision. For monocular patients, goniotomy isn’t high on my list either. For any of these patients who may be at greater risk for certain difficulties in the postop period or later, education is important, so they understand the pros and cons of goniotomy and whether it’s the right choice for them.”
Does the size of the goniotomy matter? “I think a 90-degree goniotomy probably has less risk than a 180-degree or a 360-degree goniotomy, but we don’t have studies to prove that,” Dr. Myers says. “I’d do a 90-degree goniotomy during cataract surgery in a patient who’s just trying to get off a couple of eye drops; or in a patient who needs a slight pressure reduction with modest IOP goals. I try to err on the side of caution and not subject the patient to a greater risk of hyphema in the first week since the goniotomy is for a relatively less critical indication.”
To reduce the risk of hyphema, experts say restricting certain activities and leaving the pressure high at the end of the case can help. “I’d rather have the patient’s pressure at 25 or higher right there in the operating room than have it low,” Dr. Myers says. “A transiently high pressure can prevent a bleed that might lead to a significant IOP spike later.”
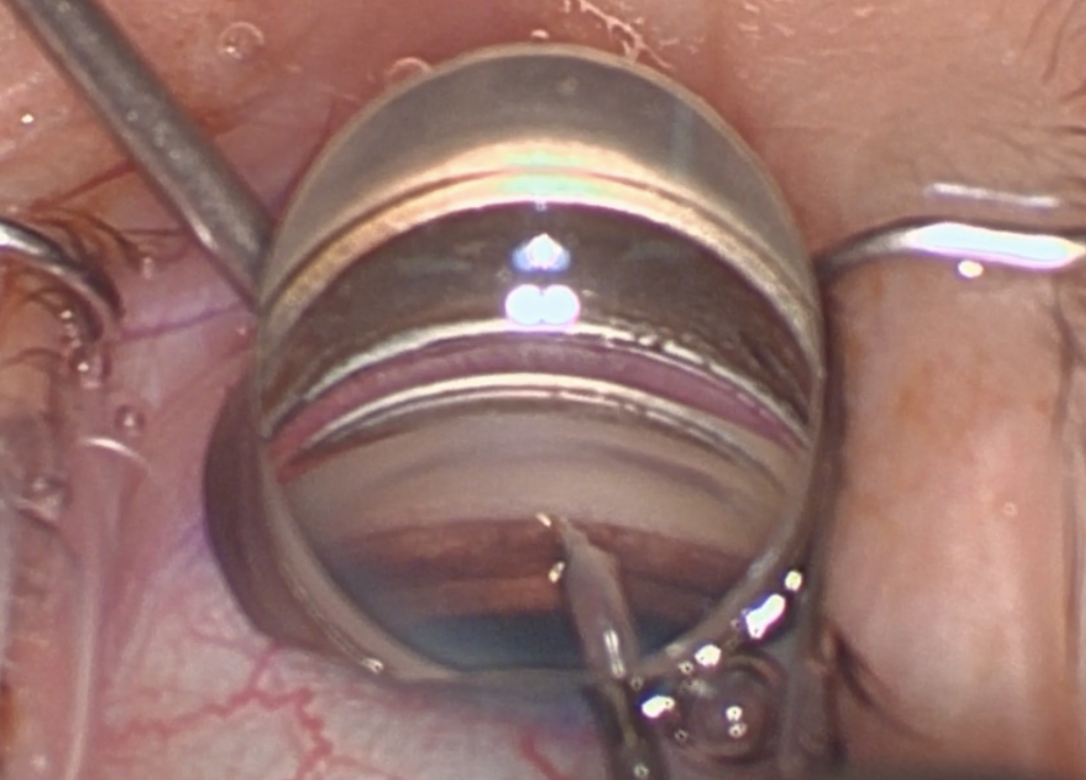 |
| Figure 1. Surgical view of the approach to trabecular meshwork with a goniotomy dual blade device. Angling the tip of the device at an upward angle helps it to pierce the trabecular meshwork for the initial entry into Schlemm’s Canal. (Courtesy of Brian Francis, MD, MS.) |
Gonio Lenses
Choosing a gonio lens comes down to surgeon preference. Some have handles, some consist of a floating eyepiece on a ring with small protrusions (resembling a Thornton ring) for stability and others have no handle and float on the eye itself with the coupling agent. Dr. Myers says he usually uses a gonio lens with a handle.
“For the combined gonio lens on the Thornton ring, the stability ring allows the surgeon to fixate the eye very precisely and rely less on the patient maintaining gaze in the right direction,” he says. “This can make a tough procedure much easier because you have this additional control. It’s always frustrating when you have a perfect view, and you go to do the goniotomy or other angle procedure and the patient starts moving or moving their eye around.”
The free-floating eyepiece allows the surgeon to have their hands free. “This can be a real advantage especially if you’re early in the learning curve,” Dr. Myers notes. “There’s nothing wrong with using your nondominant hand to support and add precision to your dominant hand as it’s learning the motions of goniotomy or other angle procedures. These lenses also provide a slightly wider view.”
Goniotomy with Phaco
In combined cataract surgery, goniotomy can be performed either before or after phacoemulsification, depending on surgeon preference. “When doing goniotomy in conjunction with cataract surgery, I typically save the goniotomy for after IOL implantation,” says Nikola Ragusa, MD, FACS, of New York Ophthalmology in the Bronx. “Removing the cataract helps to open up the angle, and you can almost always see some refluxing blood into Schlemm’s canal which can help you identify the trabecular meshwork and see where to aim your tool in trickier cases.”
Dr. Myers says he typically performs goniotomy with the KDB before phaco. “The thicker viscoelastic in the anterior chamber at the start of a case often makes for a better view than later in the case, so that’s one advantage of doing goniotomy earlier,” he says. “Another advantage of doing it in the beginning of the case is that if there’s significant bleeding at the start, the pressurization of the eye during phaco with the I/A will usually stop the bleeding before I’m done the procedure. The drawback, of course, is that substantial bleeding early on can make the next stages of the procedure more challenging when visualization can be an issue. In my experience, that’s uncommon and very infrequent.”
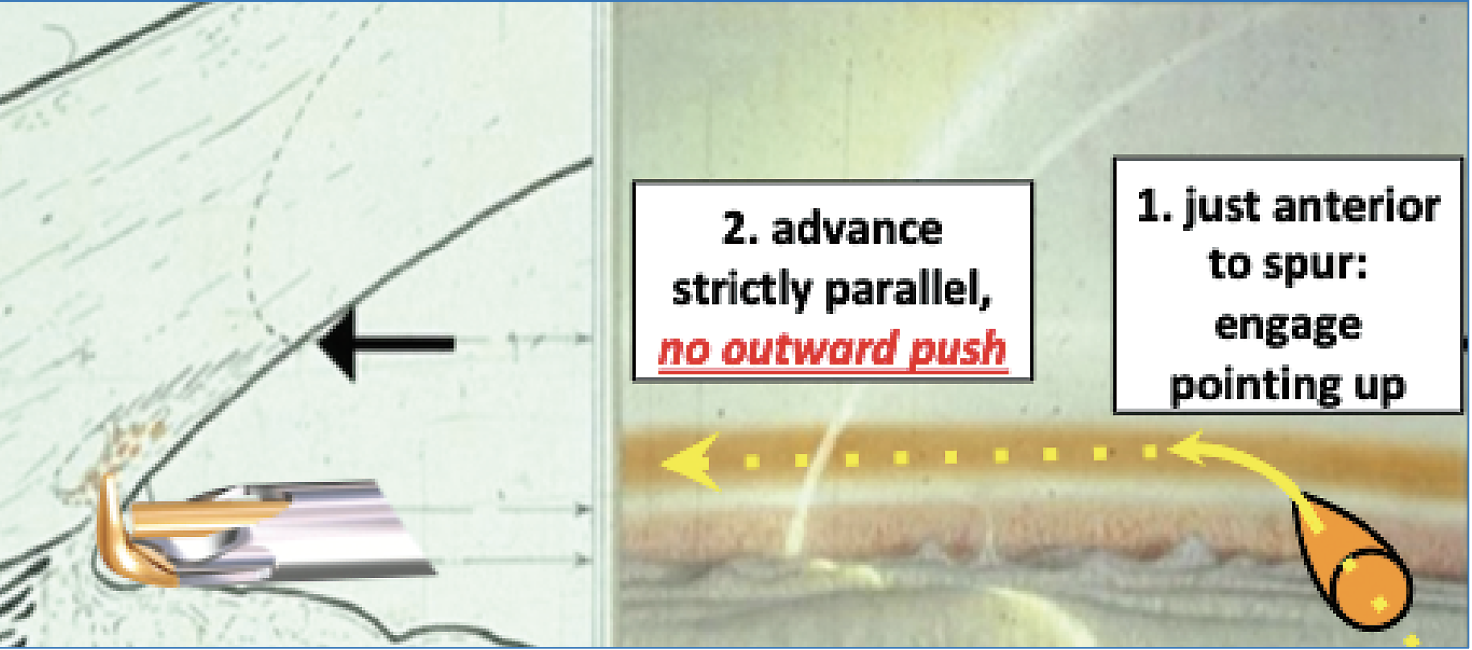 |
| Figure 2. Representative drawing of the approach to trabecular meshwork with a goniotomy dual blade device. Angling the tip of the device at an upward angle (1) helps it to pierce the trabecular meshwork for the initial entry into Schlemm’s Canal. Once the tip is in the canal, the tip is then turned parallel to the iris and advanced (2). (Courtesy of Nils Loewen, MD.) |
Instruments of Choice
For unroofing Schlemm’s canal, surgeons may use instruments such as the Trabectome, Kahook Dual Blade, TrabEx and TrabEx+, says Brian Francis, MD, MS, a professor of ophthalmology at the Doheny and Stein Eye Institutes, Geffen School of Medicine, University of California Los Angeles (UCLA). “The KDB, TrabEx and TrabEx+ are all manual devices that lift and cut two sides of the trabecular meshwork and unroof Schlemm’s canal. In contrast, the Trabectome uses an electrocautery unit and a plasma energy wave that vaporizes the tissue. The TrabEx+ and Trabectome use continuous irrigation/aspiration instead of viscoelastic like the KDB and TrabEx.”
Dr. Francis says he finds that the electrocautery approach makes tissue removal easy. “With manual goniotomy, you have to be a little more conscious keeping the blade parallel to the trabecular meshwork and of not slicing through tissue,” he notes. “If you’re at an angle and one blade is cutting tissue and the other isn’t really engaging tissue, you might slice through rather than lift and remove tissue.
“As for irrigation/aspiration versus viscoelastic approaches, each has advantages,” he continues. “With irrigation/aspiration, you have constant maintenance of the anterior chamber and removal of any refluxed blood. The disadvantage is that the instrument has to fit through a certain size incision. Because you want a good seal of the instrument within the eye and no fluid leakage around the entry site, you have to match the size of the incision to the width of the instrument. Currently, that’s 1.8 mm, so you need a 1.8- or 2-mm keratome. If you do phaco through a standard 2.4-mm keratome incision, it’s going to be a bit big for the procedure. Usually in those cases, you’d do the 1.8 keratome first, do the procedure and then enlarge the incision and do phaco afterwards. So, the advantage of doing goniotomy under viscoelastic is that you can do it with any size incision, and therefore either before or after the cataract extraction.”
Dr. Ragusa says he uses a Kahook Dual Blade or Streamline for most goniotomies. “I like that the Kahook Dual Blade is designed to fit Schlemm’s canal and excise and unroof the trabecular meshwork in a way that causes minimal harm to surrounding tissues and posterior structures,” he says. “I’ve also used the Streamline, which can be billed as either canaloplasty or goniotomy. It’s not like traditional goniotomy but it does punch a hole in the trabecular meshwork and allow an egress of viscoelastic material into the canal. It’s very gentle and the footplate allows for good positioning. Patients experience a decent IOP drop of around 20 to 30 percent.
“Some patients may have issues with insurance coverage and are stuck between a rock and a hard place with prior authorizations,” Dr. Ragusa points out. “The surgery center may not pay for a certain tool, but there are creative things you can do like use a 27-gauge needle with a slightly bent tip. I’ve done it a few times. It’s not ideal, but it’s better than leaving it alone.”
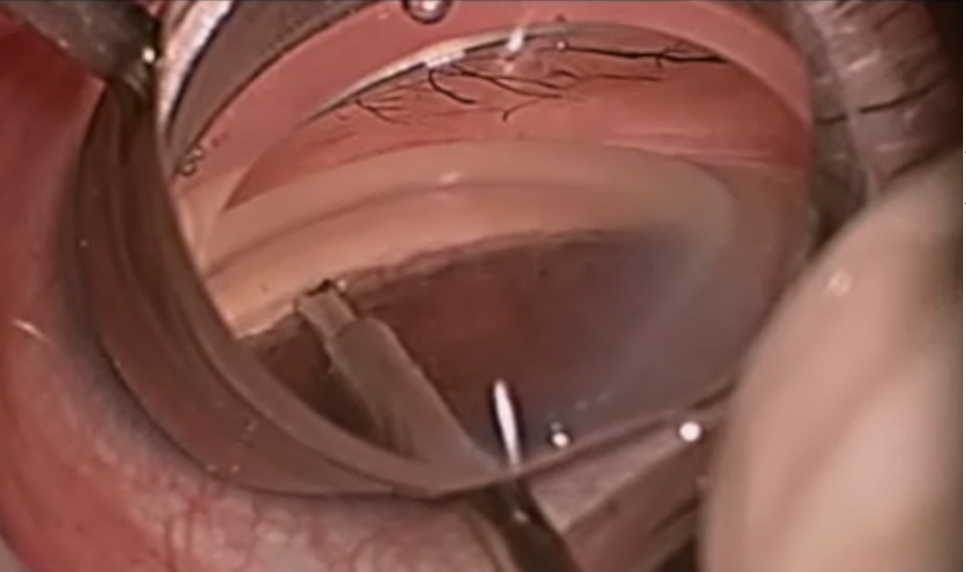 |
| Figure 3. Surgical photograph of the beginning of the backhand pass of a surgical ab interno goniotomy. (The instrument shown is the Trabectome.) (Courtesy of Brian Francis, MD, MS.) |
Anesthesia
Retrobulbar blocks, sub-Tenon’s blocks and topical anesthesia may be used. “Topical anesthesia along with gentle sedation will enable the patient to cooperate and position their eye,” Dr. Myers says. “I personally enjoy having the patient be able to turn their eye inward toward their nose to gain the best view. If you’re using blocks, a gonio prism with an incorporated Thornton ring will allow you to fixate and then move the globe as needed with the guiding hand.”
The Procedure
Once the instrument is in the eye, it’s important to avoid getting too close to the cornea or accidentally contacting the iris, Dr. Myers explains. “If you have this in mind, it won’t be a problem. Inadvertent damage to nearby structures usually happens if you’re not thinking about it,” he says. He usually starts in the middle nasally, makes a slight incision, and then sweeps from the inferior angle toward the nasal angle and then from the superior angle toward the nasal angle for a limited goniotomy with a KDB or cystotome. “This usually leaves a free strip that’s easily removed. If you leave the strip, I don’t think that’s the end of the world, but it looks less neat.”
Dr. Ragusa also uses the inside-out technique, starting in the middle and sweeping in either direction. “I do my cases with topical anesthesia,” he says. “With less security against the patient moving, this technique allows me to do the goniotomy a little quicker.”
“If I’m doing OMNI 360,” Dr. Myers adds, “I do viscodilation first, injecting inferiorly and then superiorly, and then tearing 180 degrees inferiorly or doing both the interior and superior on the second pass.”
Dr. Francis’ preferred technique uses the Trabectome and the inside-out approach. “I go forehand and backhand,” he says. “I’ll advance straight across to the nasal meshwork, right across from my incision, and engage the tissue. I go forehand, which for a right-handed surgeon is a counterclockwise movement, and then I’ll flip the instrument 180 degrees and engage it back where my incision started and go back in clockwise. I find this approach easier in terms of engaging the trabecular meshwork. If you’re left-handed, you’d do the opposite—clockwise and then counterclockwise.”
He says that engaging the tissue directly across from the incision is often easiest. “Some surgeons will go in one direction, starting as far over as they can and sweeping all the way in one direction counterclockwise. There’s nothing wrong with that, but it can be harder to engage the tissue when the instrument is at an angle. Assuming an en face approach, where the trabecular meshwork is facing perpendicular to the blade, will help.”
At the end of the case, experts say to aim for higher pressures and gently titrate the pressure down to avoid hyphema that could occur overnight or a few hours postop.
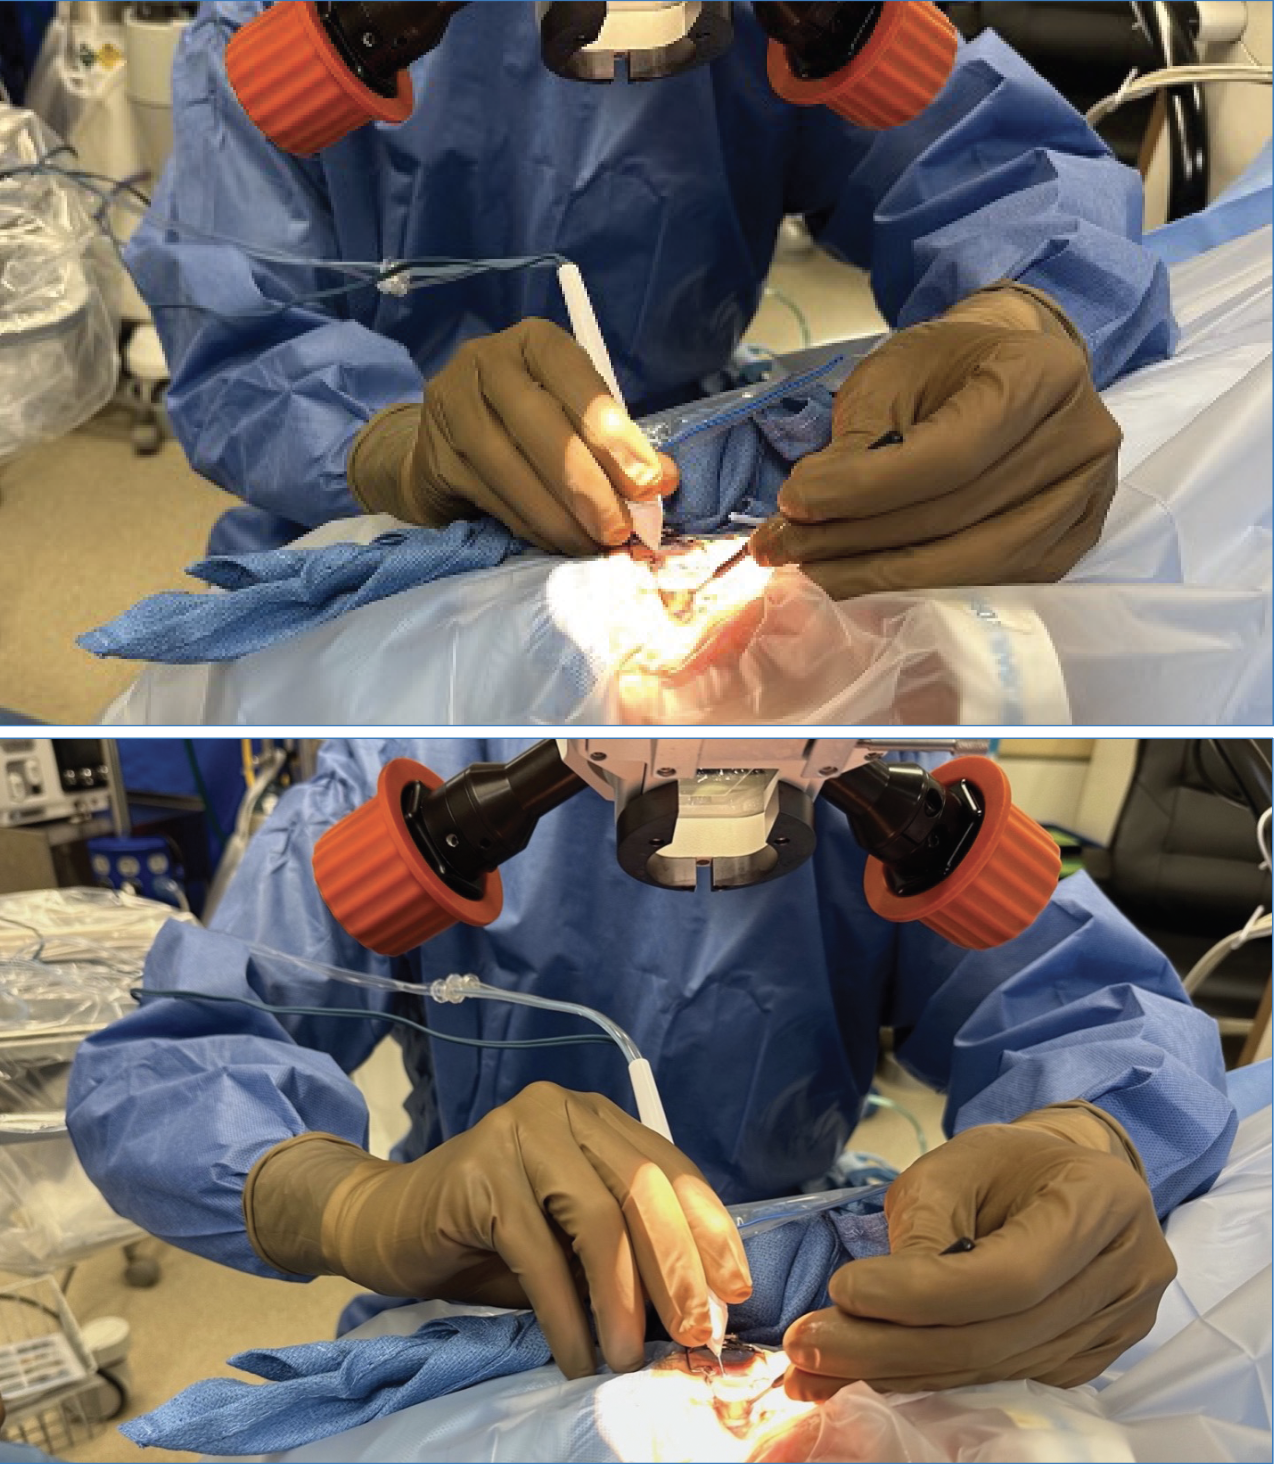 |
| Figure 4. Photographs of hand and arm position during surgical goniotomy. The top photo shows the standard grip for the forehand pass, which is from left to right in this view (counterclockwise for the surgeon). The bottom photo shows the hand and arm position for the backhand pass, in which the instrument passes from right to left in this view (clockwise for the surgeon). Note the elbow is slightly raised and the forearm and hand are turned to allow for flexion of the wrist to advance the instrument (rather than extension), which is a more natural and controlled motion. |
Pearls for Success
Here are some pearls for ensuring a smooth goniotomy:
• Consider patient mobility preoperatively. When considering a patient for any angle-based surgery in the office, Dr. Myers says to take a good look at the patient. “If the patient is kyphotic and hunched over, they may not be able to lie flat,” he notes. “Some patients can’t turn their heads to the side or extend their neck. If they have a large arcus senilus, that will make it harder to see the angle. All of these things can make a simple procedure extraordinarily difficult, so be aware of these possibilities and take a second to think when you sign up the case. It can save you a lot of gymnastics in the OR.”
“Patients need to be able to tilt their head at least 30 degrees,” Dr. Ragusa says. “If they’re not able to, you can do a really severe tilt in the scope to help with visualization.”
• Iris processes may indicate unsuitable patients. Patients with extensive iris processes may be poor goniotomy candidates, Dr. Myers explains, because “it’s easy to put traction on the iris root, causing bleeding and other problems. I’d think of doing a different procedure in a patient whose angle anatomy is either hard to fully understand or has issues that may obstruct the easy passage of your instrument. Similarly, if you’re dissecting PAS, do this with great care. If there’s bleeding from synechial dissection, the whole procedure becomes harder.”
“Most of the time, you can gently sweep away the PAS with either the goniotomy device or with a little bit of extra I/A to help peel it away,” Dr. Ragusa adds.
• Be prepared for the lightly pigmented patients. Experts say that performing gonioscopy preoperatively will ensure there’s no surprises when you perform the goniotomy. Also for patients with lighter pigment, Dr. Ragusa says a bit of blood reflux into Schlemm’s canal will help you see where you’re going. “Lowering the pressure and not having too much viscoelastic in the eye can help because the blood will paint it,” he says. “Some surgeons use trypan blue to stain the angle.”
• What sometimes looks like great surgeon skill is partly great skill in setting things up. The goniotomy setup process can pave the way for an easier surgery. “Positioning the scope and the patient’s head is key for visualization,” Dr. Myers says, noting that the patient’s head should be tilted about 30 to 40 degrees away from you. “A clear view of the anatomy makes a difference in the difficulty level of goniotomy.”
• Ergonomic injuries are common among ophthalmologists. Be mindful of your body position. Goniotomy is about visualization and small precise movements, Dr. Myers says. “If your hands aren’t in a comfortable position, it’s hard to be as precise in your movements within the eye,” he says. “I usually have my ring finger and pinky finger against the patient’s forehead and cheek.”
Wrist rests, commonly used by retina specialists, are one tool that can help stabilize a surgeon’s hands. These U-shaped devices go around the patient’s head and sit at about ear level. “Wrist rests make it very easy to sit your hand on the bar, and your hands are remarkably stable,” Dr. Myers says. “If you’re not using a wrist rest (like most anterior segment surgeons) having your fingers against the patient’s face is very helpful. Be sure do to it in such a way so you’re comfortable based on the bed position and scope position. You shouldn’t be hunching your shoulders to get your elbows and arms to the right height or extending your neck. Extending your neck to the scope is one of the most common ways to get an ergonomic injury in ophthalmology.”
• Take your time to establish a good view. “Be sure to take your time until you establish a good view because even if there’s a little bit of blood, it’ll get worse once you start manipulating the eye,” Dr. Ragusa says. “Try to clean blood away from your sights and your gonio lens.”
• Don’t put too much pressure on the back of the wound. “Surgeons who are less familiar with angle procedures often place too much pressure on the back of the wound with the dominant hand, causing egress of viscoelastic and distorting the view through the cornea,” says Dr. Myers.
• Pivot at the wound, not within the eye. Pivoting at the wound is critical, Dr. Myers explains, “because as you get to the edge of the wound, if you’re putting pressure on it, you tend to degrade the view and the pressure there makes your movements less precise within the eye.
“In order to swing correctly in the nasal angle where you’re doing the goniotomy, you need to have the right pivot point and arc, starting at that pivot point at the temporal incision,” he continues. “You want to match your arc with the curvature of the eye for precise removal of tissue and to avoid getting into trouble by either going too anterior toward the cornea or too posterior toward the ciliary body.”
• Don’t grab the back wall. This makes for a less smooth and predictable goniotomy. There should be almost no resistance when performing goniotomy. Experts say that if you feel resistance against your blade, the instrument is either wedged against the incision or you’ve gone too deep and are engaging the sclera in the back of Schlemm’s canal. For those not used to angle surgery or making the arc, it can be easy to engage the back of Schlemm’s canal.
“Once you go one or two clock hours, you’ll notice that you have to readjust the tip because the arc of your approach doesn’t exactly match that of Schlemm’s canal—it’s shallower,” Dr. Francis says. “The tip of your instrument will start to embed itself into the sclera, so you have to pull back a bit and turn the instrument to adjust the arc of approach to stay within Schlemm’s canal and avoid digging into the sclera. If you see some eye movement or the instrument isn’t moving as smoothly, that means you’re in too deep and need to back off.
“Another thing you can do is angle the tip of the blade a little upwards as you enter the trabecular meshwork,” he says (Figures 1 and 2). “For your first entrance, instead of going parallel to the trabecular meshwork and iris insertion, come upward at a little bit of an angle. That allows the tip of the instrument to pierce the trabecular meshwork. Once that’s done, you go parallel to the trabecular meshwork and Schlemm’s canal and proceed smoothly along in the canal” (see Figure 2).
“When everything is lined up well and you’ve done many goniotomies, it’s often a relaxed and straightforward procedure that doesn’t take much time at all, regardless of which technique you use,” Dr. Myers says. “However, early in the learning curve as you gain precision and learn to find the best views and comfort, things are often more challenging.”
• Change hand positions for the backhand pass. Dr. Francis says the backhand pass (Figure 3) can be tricky but made easier using certain hand positions. “As a right-handed surgeon, after I flip the instrument over 180 degrees so it’s pointing in the opposite direction, I hold the instrument with my left hand and rotate my right hand on the instrument counterclockwise. As I do this, my elbow will come up from a four or five o’clock position to a three o’clock position (Figure 4). This rotates your wrist so you can make use of the wrist’s natural flexion toward the palm instead of backwards. I find it’s easier to perform the motion for the backhand pass this way.”
• Leaving a little undone is preferable to an imperfect goniotomy. For surgeons who don’t perform goniotomy often or who are early in the learning curve, Dr. Myers advises, “If you’re at a point when you’re trying to get that last bit to make the widest goniotomy and either the view isn’t perfect or your hand position and comfort aren’t perfect, leave it be. If the patient moves or if your movements aren’t precise because the view isn’t right, a cyclodialysis cleft or other intraoperative complication isn’t worth getting that extra clock hour of goniotomy.”
Dr. Ragusa has been a speaker for New World Medical in the past. Dr. Myers is a consultant for AbbVie, Aerie, Avisi, Embark Neuro, Glaukos, Haag Streit, MicroOptx, Olleyes and conducts research for AbbVie, Aerie, Equinox, Glaukos, Guardian, Haag Streit, Laboratories Thea, Nicox, Olleyes and Santen. Dr. Francis is a consultant for MST and New World Medical.