In Part 1 of this article (see the March 2020 issue of Review), surgeons offered their advice for dealing with uncooperative pupils; poor visualization through the cornea; no red reflex; and weak or missing zonular fibers. This month they address anterior capsule tears; posterior capsule tears; bleeding inside the eye; patient coughing; wound burns; and removing a very hard cataract.
Anterior Capsule Tears
“The key with capsule tears is to recognize that a tear has happened—and then not panic,” says Nick Mamalis, MD, a professor of ophthalmology, director of ocular pathology and co-director of the Intermountain Ocular Research Center, part of the Moran Eye Center at the University of Utah in Salt Lake City. “Sometimes a tear happens without you seeing it, but you’ll notice signs that something is amiss. If the chamber suddenly deepens or the nucleus refuses to rotate, that should tell you that something out of the ordinary is going on.”
Daniel H. Chang, MD, a partner at Empire Eye and Laser Center in Bakersfield, California, agrees. “You should always maintain a high index of suspicion,” he says. “If you do something during surgery and don’t get the response that you expect, stop what you’re doing and start looking for a problem. If a lens isn’t chopping the way you think it should, or something isn’t moving in the usual way, check to see if you have a tear in the bag. If you’re using the phaco or I/A handpiece, maintain irrigation and don’t come out of the eye. Maintain pressure inside the eye to prevent possible vitreal prolapse while you assess the situation and plan your approach.”
Once you know a tear has occurred:
• Do NOT immediately pull out of the eye. “When you suspect there’s a capsular tear, the first impulse will be to come off the foot pedal and take the phaco instrument out of the eye,” Dr. Mamalis notes. “If you do that, the anterior chamber will shallow, the tear may extend and vitreous may come forward.
“The first thing we teach our residents is, if you suspect a capsular tear has occurred, stop doing the aspiration and phacoing and lighten up on the pedal, but do not come out of eye,” he continues. “Instead, inject OVD through the paracentesis you’ve already made for your second instrument. Fill the anterior chamber with OVD, so that nothing shallows; then you can come out of the eye. That can help prevent a small capsular tear from becoming a large tear accompanied by vitreous loss.
“Once you have control of the anterior chamber, you can carefully assess the situation,” he adds. “Check to see if there’s a sign of a capsular tear or vitreous coming forward.”
• Lower the infusion pressure. “Most surgeons will lower the infusion pressure if a radial tear is discovered,” says Richard Mackool, MD, medical director at The Mackool Eye Institute and Laser Center in Astoria, New York, and senior attending surgeon at the Mt. Sinai New York Eye and Ear Infirmary and New York University Medical Center. “Having a lower pressure puts less stress on the posterior capsule, thereby making it less likely that the radial tear will extend into the posterior capsule.”
 |
• Don’t stress the part of the bag with the tear. “Don’t push nuclear pieces into that area,” says Dr.
Mamalis. “And as you’re stripping cortex, strip it in the direction of the anterior capsular tear. Pulling away from it can cause it to extend.”
“Do all subsequent nuclear divisions 90 degrees away from the location of the radial tear,” adds Dr. Mackool. “Doing nuclear division 180 degrees away could actually cause the tear to widen.”
Dr. Chang advises that when cleaning out the bag in the presence of a tear, do the torn section last. “When you’re removing pieces of the cortex, try to pull toward the center and toward the direction of the tear, so you can minimize forces that may extend the tear,” he says. “I take my time, and I usually leave the area with the tear for the last part of the I/A.”
• Make sure you divide the nucleus in a manner that won’t require separating the segments widely to achieve complete division. “This means that you have to sculpt the nucleus deeply,” Dr. Mackool explains. “That’s because the deeper you sculpt, the easier it is to separate and divide that region of the nucleus. If there’s less resistance to the separation, getting the halves apart won’t put as much stress on the tear.”
• Consider implanting a one-piece lens. “If I have an anterior capsular tear, I definitely prefer a one-piece lens to a three-piece lens because of the compression needed to get the haptics in the bag,” says Dr. Chang. “One-piece lenses go in fairly compactly and open up slowly, so you can position the lens in the direction you’d like it to unfold. Also, one-piece lenses don’t exert as much directional force as three-piece lenses do.”
• Make sure the lens will unfold without stressing the tear. “When I insert the lens, I place it so that a haptic doesn’t unfold into and extend the tear. I also prefer not to have the distal portion of the haptic span the area of the tear,” says Dr. Chang. “If the anterior capsular tear hasn’t already extended posteriorly, the force of the haptics shouldn’t cause the tear to open any further.”
Posterior Capsule Tears
“There are plenty of ways you can cause a posterior tear,” notes Dr. Chang. “Regardless, if the hole or tear is relatively small and central, you may be able to convert it to a posterior capsulorhexis, which can stabilize the opening and allow for a posterior chamber IOL. After the eye heals, it’s as if the patient has already had a YAG.”
Dr. Mamalis concurs. “If you have the nucleus out of the eye and you’re doing some cortical cleanup and you cause a small posterior capsule tear, you can often go ahead and put some OVD behind the tear, push the vitreous face away and carefully use your capsulotomy forceps to make a small round posterior capsulotomy in this area,” he says. “However, this will only work if you don’t have vitreous coming forward and it’s just a small posterior tear.”
If an anterior tear has extended into the posterior capsule, the advice is similar to that for an anterior tear.
“If the tear extends into the posterior capsule, the first thing to do is resist the impulse to remove the phaco or I/A handpiece from the eye,” says Dr. Mackool. “If you do so and the posterior capsule bulges forward because of low IOP, that will increase the risk of the tear extending and the vitreous coming forward. So stay in the eye with the phaco or I/A handpiece and the foot pedal in position one, which is infusion. Then, with your left hand, inject dispersive viscoelastic right against—and even through—the posterior capsule opening.”
Dr. Mackool points out that doing this requires holding the syringe in one hand and using your thumb to depress the plunger while you hold the phaco or I/A tip in the correct spot with the other hand. “That maneuver needs to be practiced a little bit when you’re not under pressure to do it perfectly,” he says. “If you only do it when you discover you have a posterior capsule opening, you may never get good at it. So, I encourage surgeons to practice this at the end of I/A in a routine case, before injecting the IOL. Inject OVD through the sideport using your nondominant hand, in the manner I’ve just described. Do that regularly until you become facile at it. Then, when you really need to do it to prevent a problem, you can.”
Norfolk, Virginia’s Elizabeth Yeu, MD, an assistant professor in the department of ophthalmology at Eastern Virginia Medical School and medical director of the Virginia Surgery Center, adds that if a posterior tear necessitates placing a three-piece lens in the sulcus, she recommends using optic capture, with the haptics in the sulcus and the optic in the bag. “If I have a well-centered, 4.5- to 5-mm capsulorhexis, I’d use an optic capture,” she says. “This is better than simply placing the lens in the sulcus. With optic capture, the lens power calculation remains the same, and you’ve done a great service for the patient because the lens will always remain centered. It eliminates any concern about recurrent iritis or UGH syndrome from the posterior chaffing of the iris or ciliary body. Also, if you just passively place a three-piece lens into the sulcus, decentration can definitely occur.”
Dr. Yeu reiterates that it’s important to prevent the chamber from shallowing if you have a posterior capsule tear. “If the chamber shallows in that situation,” she says, “the vitreous will prolapse and come forward.”
 |
Bleeding Inside the Eye
“During intraocular anterior-segment surgery, bleeding that’s problematic is virtually always from the iris root,” says Dr. Mackool. “Bleeding from the iris itself, should it occur, is always minor. But the iris root has some large vessels, and they can really bleed.
“The treatment for that is to inject dispersive OVD right into the angle,” he continues. “The OVD will contain the blood in that area. Then stop and wait five or 10 minutes. The blood remaining at the traumatized site will clot, and the bleeding will stop. Then inject more OVD and visco-express the blood from the eye, beginning near the clot.”
Dr. Mamalis says that if he encounters bleeding he often uses a high-molecular-weight, cohesive OVD to try to tamponade it. “It’s very uncommon to have bleeding that can’t be controlled in this way,” he notes. “Later, be sure to keep the eye well-pressurized when removing your instruments, so the bleeding doesn’t resume.”
Dr. Chang says that he helps prevent choroidal hemorrhaging by making sure that the head of the bed is elevated so the operative eye is the highest part of the body. “My patients never lie completely flat,” he says. “Most of the time they’re at least 10 or 15 degrees inclined, especially if the patient has a barrel chest or big abdomen. This minimizes the chance of posterior pressure and helps prevent choroidal issues.”
“If you try to soldier on and ignore anything more than a tiny amount of bleeding, you’re asking for big trouble,” Dr. Mackool adds. “If you can’t see what you’re doing, you’re very likely to traumatize other areas.”
The Patient is Coughing
Dr. Chang notes that patient coughing during the surgery can sometimes become a problem. “A little coughing during surgery isn’t unusual,” he says. “Sometimes patients choke on their own saliva, but they usually clear after a few coughs. However, every once in a while—especially with smokers—patients continue to cough and begin to valsalva, thus increasing pressure to the face and orbits.
“If the patient coughs against a soft eye, there’s a chance they’ll damage their choroidal circulation and bleed,” he continues. “Therefore, when the patient coughs, the key is to maintain the intraocular pressure. How you do that will depend on where you are in the surgery, but the simplest way is to inject viscoelastic into the eye until you’ve reached at least physiologic pressure. Most surgeons’ instinctive reaction is to pull out and let the patient cough. However it’s important to stay in the eye and maintain pressure, because if you do pull out and let the patient cough for a while, the eye may not be in the same condition when they finish coughing. So either I pull out of the eye and inject viscoelastic, or I stay in the eye and maintain irrigation and pressure.
“The trickiest situation is if the patient coughs during the phacoemulsification step,” Dr. Chang adds. “In that situation I try not to pull out of the eye; I set the handpiece on continuous irrigation so there’s less likely to be any accidental damage. The primary goal is to maintain pressure in the eye until the coughing resolves.”
 |
Wound Burns
“A wound burn is a serious complication,” says Dr. Mamalis. “It can happen in a matter of seconds if the circulation of BSS around the phaco tip is blocked. To prevent this, don’t go directly to ultrasound when you first insert the phaco tip. Instead, irrigate a little bit to make sure that cohesive OVD isn’t plugging the area around the tip. You should see the OVD being a little disturbed, indicating that flow is occurring. Once you’re sure you have adequate irrigation and aspiration going on around the tip and sleeve, then go to phaco.
“Also, make sure the phaco tip and sleeve are properly sized to fit through the smaller wounds we’re making today,” he adds. “If the phaco handpiece and sleeve fit too tightly, you can get disruption of the flow of the BSS underneath the sleeve and around the phaco tip, resulting in a wound burn.”
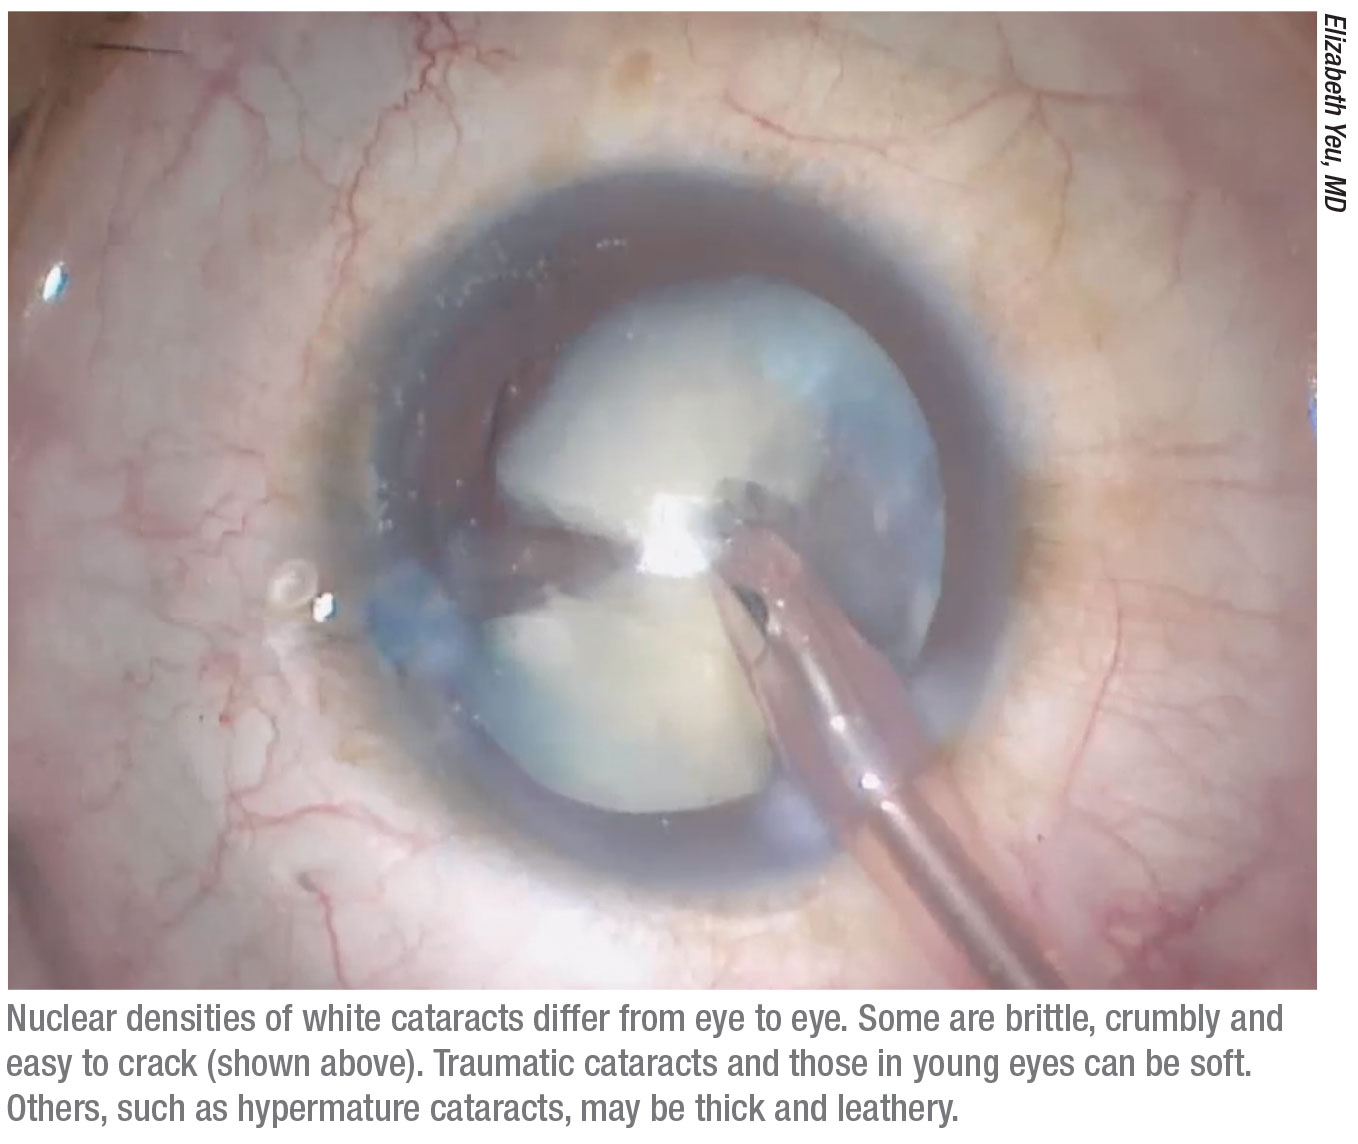
Removing a Hard Nucleus
“The key to dealing with hard lenses is patience,” says Dr. Mackool. “Getting the nucleus out without causing any harm takes time. The very hard ones—the red or black ones—will give any surgeon fits. You have to be mentally prepared to fight that battle for several minutes.
“The hard part with a dense nucleus is disassembling it,” he continues. “You typically have to use some variant of the divide-and-conquer method. Once you’ve divided a hard lens in half you can usually chop each half into quarters, but dividing it in half is the most difficult part of the case. You have to use high magnification and sculpt the center of the nucleus down to one millimeter or less of thickness near the center, and get it almost that thin out toward the periphery. That takes several minutes.”
With a hard nucleus, Dr. Mamalis says he likes to use a crater-and-chop technique. “Abhay Vasavada, MD, in Ahmedabad, India, has developed a nice technique in which you try to groove as much as you can in the center; then try to chop partially; then move a little bit deeper and chop again,” Dr. Mamalis says. “The key thing is that you have to do multiple chops. You may want to break the hard nucleus into six or eight pieces.”
Several surgeons have noted that a hard nucleus sometimes has a very leathery posterior plate. “You try to crack the plate, but instead of cracking, it bends as if it’s a piece of shoe leather,” Dr. Mamalis explains. “That can be very difficult to manage. You have to try to chip away at the nucleus anterior to that and save the posterior plate for the end. You may try to lift the lens up out of the capsular bag, but manipulating it can sometimes cause capsular tears.”
Surgeons offer these additional pearls for removing a hard nucleus:
• Determine why the cataract is so mature. “Is it just because the patient decided not to seek care? Did the patient have a lot of intravitreal injections that sped up the formation of the cataract? Or did the patient have a vitrectomy in the past?” Dr. Yeu asks. “It’s important to know this, because if the patient has a prior vitrectomy for example, the posterior capsule could be compromised.”
• Make the rhexis larger. “If I know the cataract is very dense, I’ll make my rhexis larger to provide more forgiveness and safety,” says Dr. Chang. “I usually want it slightly over 5 mm, so it can overlap the lens 360 degrees, but if I’m dealing with a nuclear sclerosis that’s 3+ or higher, I’d create a rhexis that approaches 6 mm to reduce the chance of tearing the anterior capsule if a large fragment wants to prolapse forward. An ounce of prevention is worth a pound of cure.”
 |
• Don’t try to use a femtosecond laser to break up the nucleus when it’s very dense. “That simply won’t work in this situation,” Dr. Mackool explains. Dr. Yeu agrees. “Once the lens is rock hard and opaque,” she says, “the laser often does a poor job and won’t break up the lens nearly as well is it would in a softer nucleus.”
• Use a larger phaco needle. “Instead of my usual 20-ga. needle, I’ll go to a 19-ga.,” says Dr. Chang. “Using a larger-bore needle makes nuclear disassembly and removal faster and more efficient, and it’s safer for the patient. Of course, I use a slightly larger incision as appropriate.
“When an eye has a hard lens,” he adds, “vision is generally poor, so any consequences of a larger incision, such as potential astigmatism induction, aren’t as significant. These patients want the cataract out, and they want it out safely.”
• Make sure the corneal endothelium remains coated with dispersive viscoelastic. “It’s crucial to protect the cornea during longer procedures,” notes Dr. Mackool. “When dealing with a dense nucleus you’re running more fluid through the eye and using more ultrasound, so you have to keep the endothelium coated with dispersive viscoelastic to protect it from damage.”
Dr. Mamalis notes that OVD also helps to keep the capsular bag taut. “Refilling the bag with OVD can help to keep it away from the hard nucleus you’re trying to work with,” he says. “That may prevent you from tearing the capsule or disrupting the zonules.”
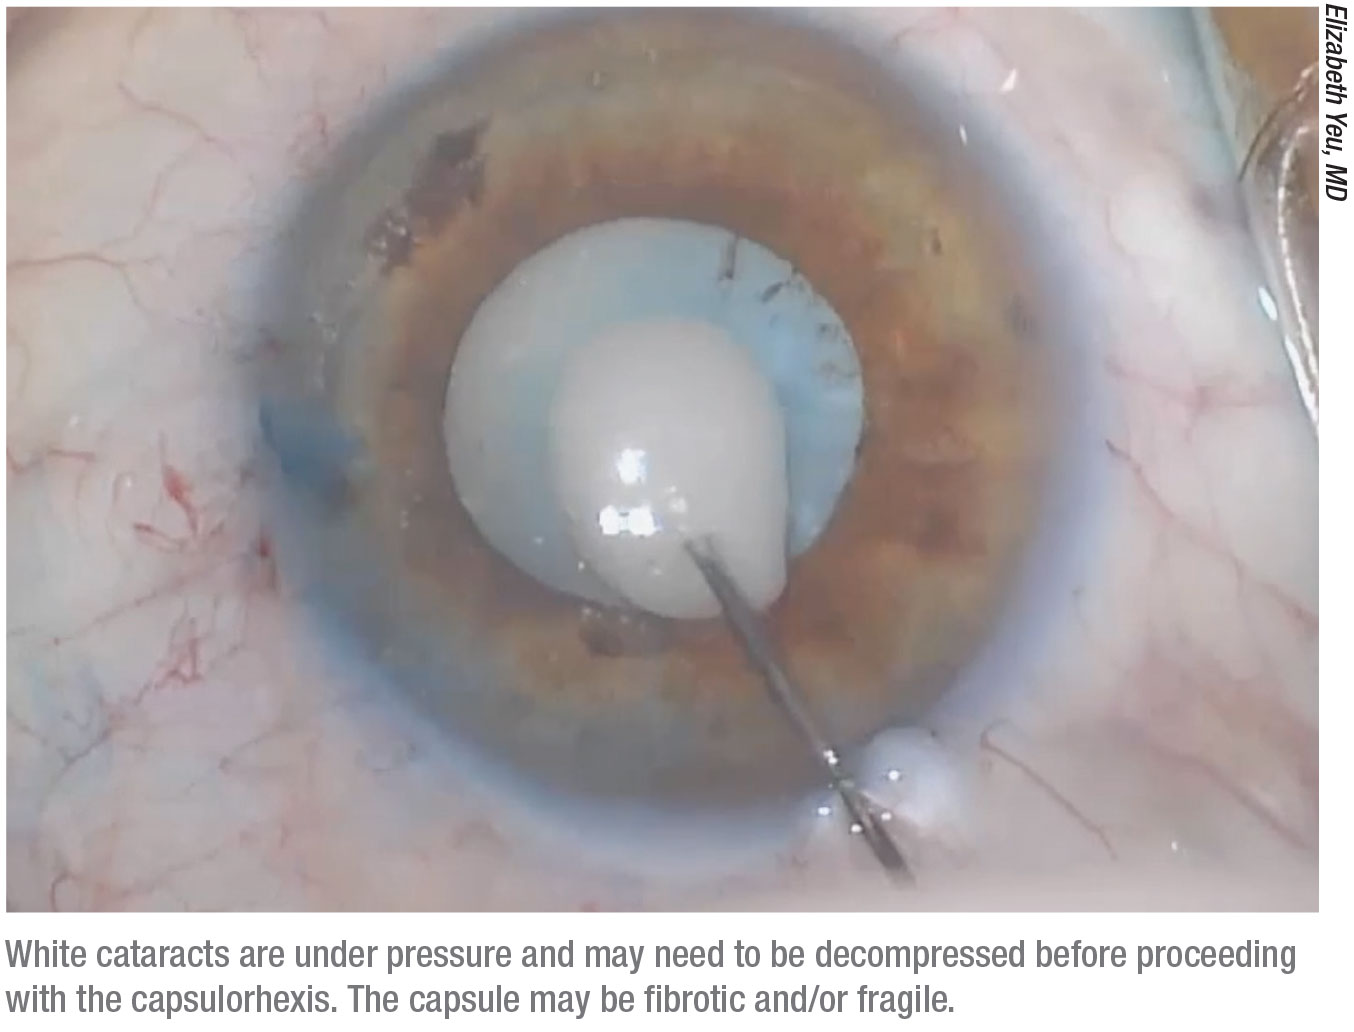
• Remember that the cataract may be under high internal pressure and require decompression. “A brunescent brown, black or red-tinted lens can have something resembling a white shell,” notes Dr. Yeu. “In that situation the lens is under a lot of pressure, and needle decompression is going to be extremely important to help prevent the Argentinian flag sign. I use a 27-ga. needle and bevel down through my temporal wound (or through the paracentesis before the primary wound is created) after the eye is filled with viscoelastic. I enter right where I normally would with a cystotome. Then I draw back in order to get rid of some of the cortical material and some of the pressure that’s built up inside the lens.”
• Don’t let the empty capsular bag flop around. “Hard lenses are large and the bag has been stretched over time,” explains Dr. Yeu. “Once you remove the cortex the bag will be very floppy. Be aware of this and do everything you can to protect the posterior capsule. Use fluidics to minimize flapping and bouncing. One option is to refill the bag with viscoelastic. I normally use the Koch spatula to help manage this situation and hold the posterior capsule back.” REVIEW
Dr. Chang is a consultant for Zeiss. Dr. Yeu is a consultant for Omeros. Drs. Mackool and Mamalis have no relevant financial ties to any product discussed.